Table of Contents
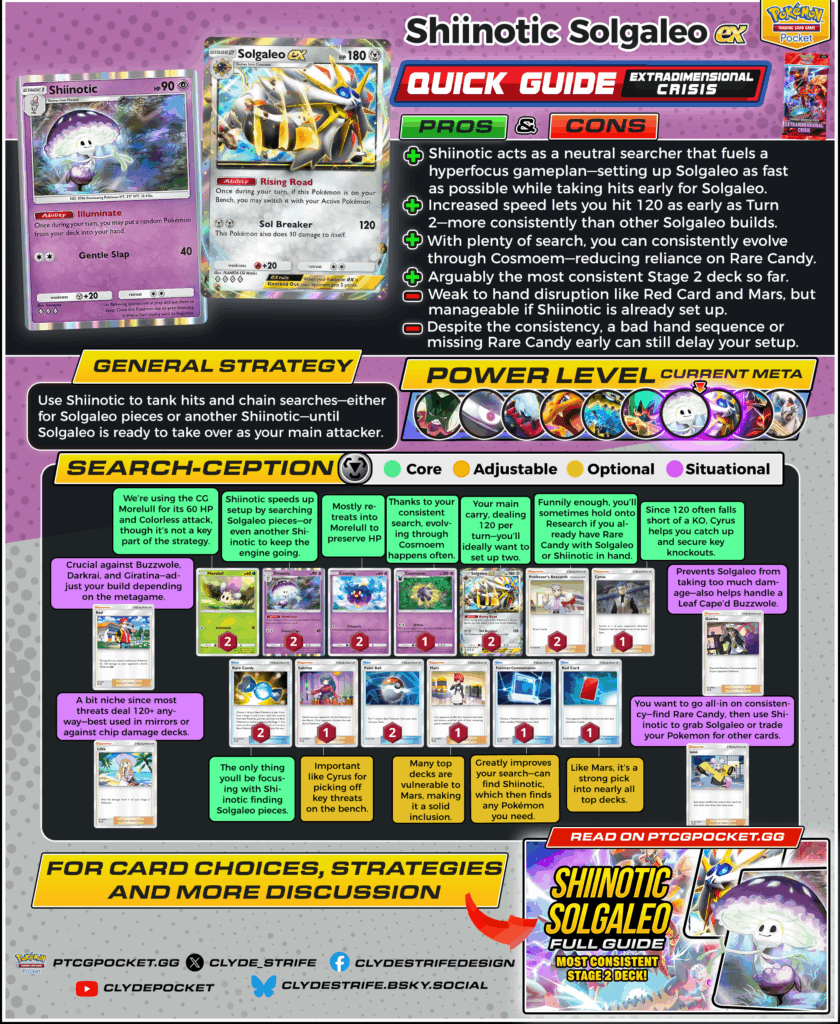
Stage 2 decks got faster with A3-144—but this one takes it even further. By pairing A3a-027’s relentless search power with A3-122’s early pressure, you get one of the most consistent evolution decks in the format. Dealing 120 damage as early as Turn 2 has never felt this smooth. It’s also one of the best counters to A3a-061 A2-089. If you’ve been waiting for a Stage 2 deck that truly keeps up with the meta—this is it.
Here’s a full breakdown of how the deck works.
Strengths & Weaknesses
| Pros | Cons |
| + A3a-027 acts as a neutral searcher that fuels a hyperfocus gameplan—setting up A3-122 as fast as possible while soaking early hits. | - Weak to hand disruption like PROMO-006 and A2-155, though manageable if A3a-027 is already in play. |
| + Increased speed lets you hit 120 as early as Turn 2—more consistently than other A3-122 builds. | - Despite the consistency, a bad hand sequence or missing A3-144 early can still delay your setup. |
| + With plenty of search, you can consistently evolve through A3-086, reducing reliance on A3-144. | |
| + Arguably the most consistent Stage 2 deck so far. |
How to Play Shiinotic Solgaleo ex
This deck runs on a hyper-consistent setup engine, with A3a-027 chaining search after search to assemble your A3-122 line. The goal is to get A3-122 into play as early as possible—ideally by Turn 2—and start dealing 120 damage every turn. We run only Metal Energy, since A3-122 is your sole attacker and A3a-027’s attack only requires Colorless. With the right pieces in place, the deck snowballs fast, using tanking and disruption to maintain control.
If You Start with A1a-007
This is your ideal starter.
- If you can evolve into A3a-027 on Turn 1, you’re in a strong position to begin searching for A3-122 pieces on the next turn. If not, just let A1a-007 soak early hits to protect your A3-085 while you set up.
If You Start with A3-085
- If possible, retreat into A1a-007 to preserve A3-085’s HP. If that’s not an option, let it tank damage and begin assembling a second one. From there, A3-086 becomes a priority to reduce pressure on finding A3-144.
Early Priorities
- Use A3a-027 to search for A3-122 line pieces, or chain into another A3a-027 for even more consistency.
- Play A1a-007 early so that if you draw A3a-027, you can immediately chain another search.
- Attach Energy to A3-085—you want to be attacking with A3-122 as soon as it hits the board.
- If you don’t have A3-144, prioritize evolving into A3-086 right away to reduce your reliance on drawing Candy later.
- A2-146 is key for smoothing out your hand—use it to get A3a-027 when you only have A1a-007, or find A3-122 if you already have A3-144 and A3-085.
- Sometimes it’s correct to hold onto PROMO-007 if you already have A3-144 plus either A3-122 or A3a-027 in hand. That’s already a winning combo—at that point, your goal becomes protecting it from disruption like PROMO-006 or A2-155.
- If you're missing A3-144 but have the rest of the combo, use A3a-027 first to thin out Pokémon, then PROMO-007 to increase your chances of hitting Candy.
- Sequence Poké Ball and A3a-027 wisely. If you desperately need A3-085, using A3a-027 to find A1a-007 first ensures Poké Ball has a better chance of getting A3-085 next.
- A1-225 can be used to delay your opponent if you want to protect A3a-027.
- As mentioned in my other guides: if you’re planning to reset your hand, it’s often smart to bait a PROMO-006, A2b-069, or A2-155 first. Keep your hand at four or more if you’re okay with a reset, and below three if you want to avoid one.
- PROMO-006 is best played turn 1 when going first, especially to slow your opponent’s access to key cards like PROMO-007 or A3-144.
- A2-155 is flexible—it can be effective later, but if you’re facing another Rare Candy deck, it’s usually correct to play it Turn 1. In those matchups, use A2-155 early to disrupt their ability to find A3a-061 and maintain tempo.
- Against A3a-061 A2-089, it’s often better to hold PROMO-006 and A2-155 until they’re about to reach 2 Energy. They usually hold off on playing A3a-067 until they’re ready to attack with A3a-061, so disrupting at that timing hits harder.
Midgame
- By now, you should have A3-122 ready to attack. Ideally, you’ve also held off on losing any points—this gives you the freedom to trade one A3-122 for 2 points and immediately follow up with a second.
- Thanks to A3-122’s ability, you can retreat A3a-027 into it and start swinging right away without missing a beat.
- If A3-122 isn’t ready yet, A3-086’s attack can stall by mitigating 50 damage—use this to buy time while you search for A3-144 or finish assembling your next evolution.
- If you had a rough start, sacrificing a A1a-007 or A3-085 is sometimes your best line until you can piece together a full A3-122. Don’t be afraid to take the loss early if it buys time for your full setup.
- Preserving one A3-122 while setting up another is often the best midgame plan—it pressures your opponent to use a A2-150 to break through, or risk falling behind.
- This is where A1-225 and A2-150 shine, letting you pick off threats that tried to retreat or chip down evolving attackers before they become a problem. With how fast your deck runs, you’ll often be in position to force early knockouts before your opponent can react.
Card Choices
Core
Must-have cards the deck relies on to function.
- A1a-007 – We’re using the CG version for its 60 HP and Colorless attack, though it’s not a key part of the strategy.
- A3a-027 – Speeds up setup by searching A3-122 pieces—or even another A3a-027 to keep the engine going.
- A3-085 – Mostly retreats into A1a-007 to preserve HP.
- A3-086 – Thanks to your consistent search, evolving through this happens often.
- A3-122 – Your main carry, dealing 120 per turn—you’ll ideally want to set up two.
- A3-144 – The only thing you’ll be focusing on with A3a-027 is finding A3-122 pieces to evolve quickly.
- PROMO-007 – Sometimes held if you already have A3-144 and combo pieces, to avoid losing them to PROMO-006 or A2-155.
- A2-150 – Since 120 often falls short of a KO, this helps you catch up and secure key knockouts.
- PROMO-005 – Searches your Basics, increasing consistency even more.
Optional
Cards that can be cut without hurting core consistency.
- A1-225 – Important like A2-150 for picking off key threats on the bench.
- A2-146 – Greatly improves your search—can find A3a-027, which then finds any Pokémon you need.
- A2-155 – Many top decks are vulnerable to this, making it a solid inclusion.
- PROMO-006 – Like A2-155, it’s a strong pick into nearly all top decks.
Situational
Techs that only matter in specific matchups.
- A2b-071 – Crucial against A3a-006, A2-110, and A2b-035—adjust your build depending on the metagame.
- A3-155 – A bit niche since most threats deal 120+ anyway—best used in mirrors or against chip damage decks.
- A3-151 – Prevents A3-122 from taking too much damage—also helps handle a A3-147 A3a-006.
- A2b-069 – You want to go all-in on consistency—find A3-144, then use A3a-027 to grab A3-122 or trade your Pokémon for other key cards.
Final Thoughts
With A3a-027 setting up A3-122 faster than most Stage 2 decks, this build delivers consistent Turn 2 pressure. While it's still vulnerable to disruption, its raw speed and search power make it a strong meta pick—especially into A3a-061 A2-089.
You can also check out our other guides for more insights! With the ranked format here, now is the perfect time to master these strategies, climb the leaderboard, and dominate matchups!