Table of Contents
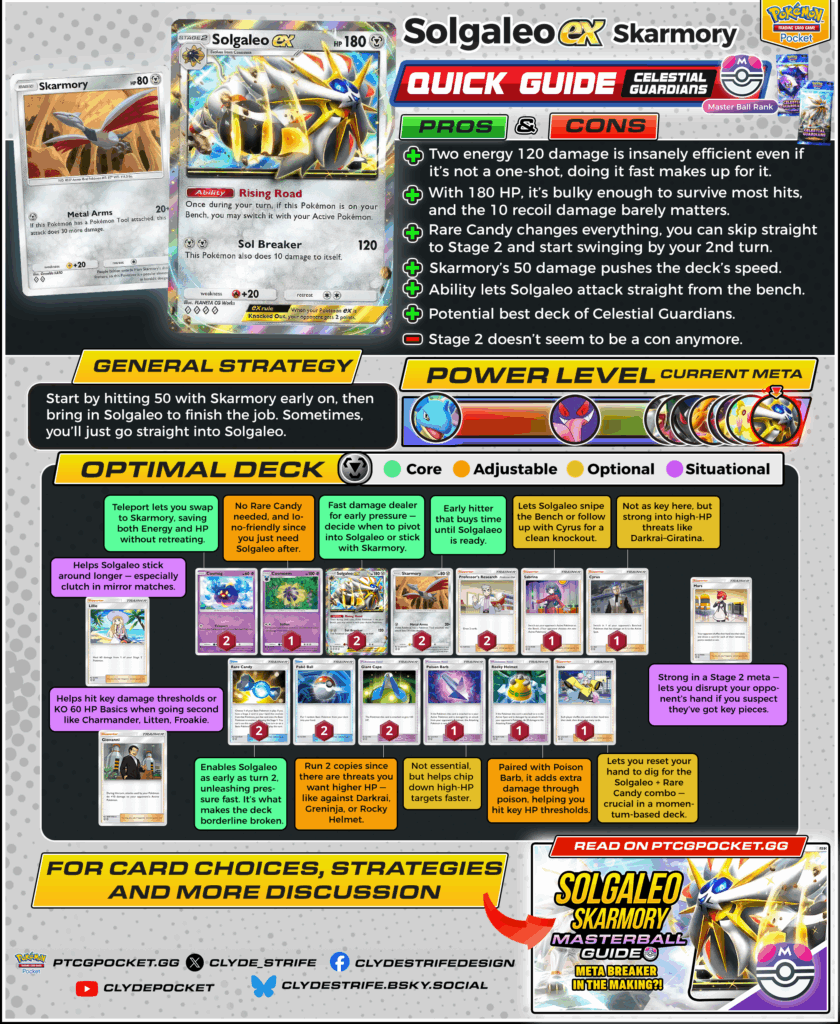
Celestial Guardians introduced some strong contenders, but few feel as explosive and efficient as A3-122 paired with A2-111. With early pressure, high power, and one of the fastest Stage 2 activations we’ve seen so far, this deck is aggressively climbing the ladder — and it’s not just a gimmick.
It’s consistent, it hits hard, and it thrives in a meta where most players don’t expect a Stage 2 to move this fast.
Here’s everything you need to know about why A3-122 might be one of the best decks to bring into the current format.
Time to see what A3-122 really made of.
Strengths & Weaknesses
| Pros | Cons |
| +Two Energy for 120 damage is incredibly efficient — even if it’s not a one-shot, doing it early makes up for it. | - Stage 2 doesn’t seem to be a con anymore. |
| + 180 HP gives A3-122 enough bulk to survive most hits, and the 10 recoil rarely matters. | |
| + A3-144 changes everything — skip to Stage 2 and start swinging by turn 2. | |
| + A2-111 adds speed and pressure right from the start. | |
| + A3-122’s Ability lets it attack safely from the Bench, which is huge. | |
| + Could be one of the top decks of Celestial Guardians. |
How to Play Solgaleo Skarmory
Game Plan
The core goal is to get A3-122 attacking as fast as possible. You can start with A2-111 to apply early pressure, or go straight into A3-122 if you have A3-144 and the pieces in hand. Both lines are strong — it just depends on the matchup and your opener.
Turn 1
- If you start with A2-111:
Your main goal is to apply early pressure by hitting 50 with Metal Arms while setting up for A3-122. In some cases, you won’t need to attach Energy to A2-111 — especially if you have the A3-144 + A3-122 combo and can hit 120 right away. This is the stronger line if you’re confident you can build two A3-122 during the match. Don't bench A3-085 on the first turn because you might get A1-225-ed and delayed on attacking. - If you start with A3-085:
Going second is usually better. Attach Energy to A3-085 and use its attack to switch into A2-111 — this keeps A3-085 safe and lets you apply pressure on the following turn. If you already have the A3-144 combo, you’ll need to decide whether to swing with A2-111 or go straight into A3-122. Since you're already behind on tempo, evolving immediately and using Rising Road to switch A2-111 is often the better choice — especially if you expect to build a second A3-122 later. - Finding the A3-122 + A3-144 combo is prioritized. If you're running A2b-069 or A2-146, resetting your hand is sometimes the way to go — especially if you don’t start with PROMO-007.
- If you can’t find the A3-144 + A3-122, it’s sometimes better to keep your hand large — it can bait your opponent into playing A2-155, giving you a free hand reset and a chance to draw into the combo.
- Don’t attach Tools unnecessarily — only use them when needed. With a lot of A3-151 around, it’s often better to stick to one Tool at a time.
Midgame
- A3-144 into A3-122 as early as possible — this is when the deck starts to snowball. Play around disruption tools like A2b-069 or A2-155 by evolving as soon as you can. Delaying often leads to losing your combo, so it’s usually better to commit early.
- If you have A3-086 in hand and don't have A3-122 yet, evolving the A3-085 is usually better so you can just find the A3-122 with A2b-069 without worrying about A3-144.
- Managing your points is important — especially if A2-111 hasn’t been knocked out yet. That opens the door to using two A3-122 in a game.
- If A2-111 has already been knocked out, you still have the option to send out another A2-111. You can afford it, since you still have enough points left to end with A3-122.
- Use Rising Road to bring A3-122 Active and start attacking right away.
- Attach A2-147 or healing cards to help A3-122 survive key turns — especially if it keeps you from giving up a knockout. When you have extra Energy, put it on A3-122 as well — it helps with retreating later if you need to pivot out.
Endgame
- A3-122 should be your main damage dealer from here on.
- Manage when to play A1-225 and A2-150 carefully — they’re key to securing knockouts at this stage. With how fast this deck moves, every play counts, and you’re often racing against the clock to stay ahead in tempo.
Card Choices
Core
Must-have cards the deck relies on to function.
- A3-085 – Evolution line for A3-122. You’ll usually want to A3-144 into A3-122 directly.
- A3-122 – Your main attacker. Hits 120 from the Bench for just 2 Energy and shrugs off most threats with 180 HP. The recoil is minimal compared to the pressure it brings.
- A2-111 – Early attacker and pivot. Hits 50 for one Energy and survives just enough to force trades. Also lets you stall or preserve Energy before A3-122 gets going. You usually want to run two.
- A3-144 – The most important card in the deck. Enables turn 2 A3-122 plays. Two copies are the sweet spot — enough to draw into, but not clog the hand.
- PROMO-005 & PROMO-007 – Core draw engine.
Adjustable
Flexible picks you can tweak based on meta or preference.
- A3-086 – No A3-144 needed, and Iono-friendly since you just need A3-122 after.
- A2-147 – Run 2 copies since there are threats you want higher HP — like against A2-110, A1-089, or A2-148.
- A2-148 – Paired with A3-146, it adds extra damage through poison, helping you hit key HP thresholds.
Optional
Nice to have, but can be cut without hurting consistency.
- A3-146 – Adds extra damage pressure by applying Poison. Helps you hit key damage thresholds, especially when paired with A3-122’s recoil.
- A2b-069 – Can reset bad hands or disrupt opponents trying to build combos. Also lets you redraw into key pieces if you’re bricked.
- A1-225 – Great for hitting around the Bench or setting up two-prize turns. Works best when you’ve softened targets with chip tools.
- A2-150 – Clutch finisher. Lets you pull up key targets and close out games when you’re ahead or need to punish a misstep.
Situational
Techs that only matter in specific matchups.
- A3-155 – Helps A3-122 stick around longer — especially clutch in mirror matches.
- A1-223 – Helps hit key damage thresholds or KO 60 HP Basics when going second like A2b-008, A3-030, A1-087.
- A2-155 – Helps A3-122 stick around longer — especially clutch in mirror matches.
Final Thoughts
This deck is fast, brutal, and way stronger than most expect. A3-122 hitting 120 from the Bench on turn 2 while A2-111 pressures early makes it feel almost unfair. If you're looking for a deck that punishes slow setups and steamrolls once it gets going — this is it.
You can also check out our other guides for more insights! With the ranked format here, now is the perfect time to master these strategies, climb the leaderboard, and dominate matchups!