Table of Contents
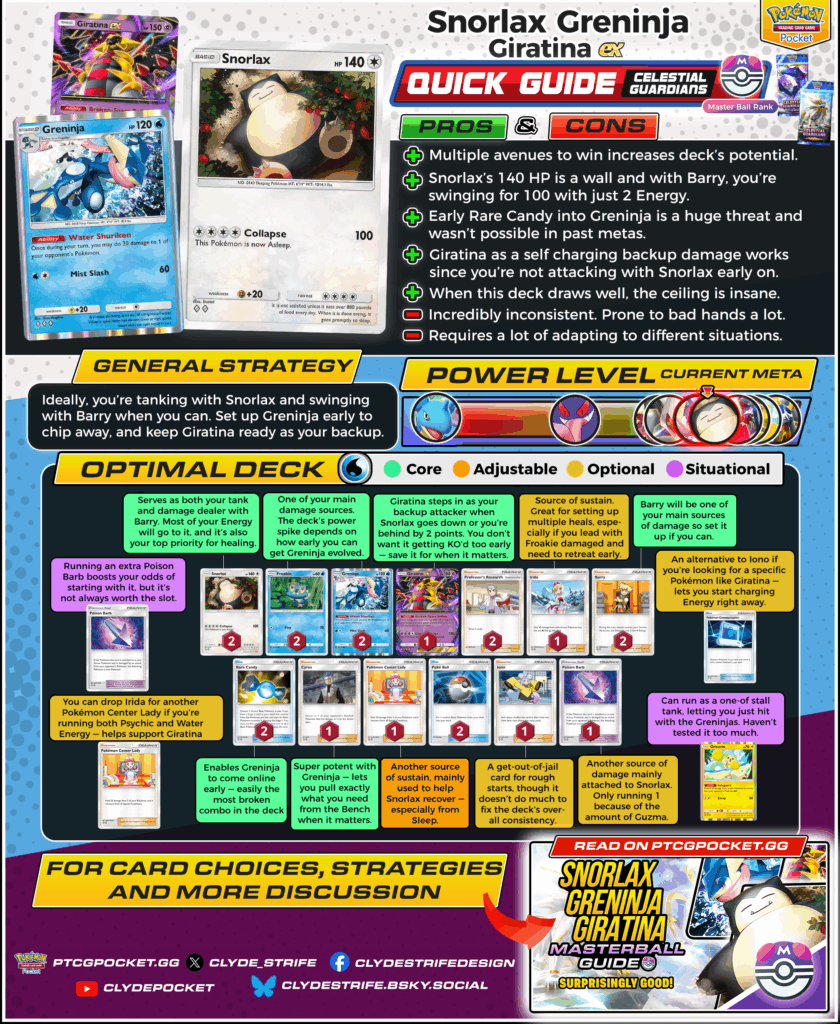
After hitting a wall at Ultra Ball 4 with A3-122 A2-111, I figured it was time to try something new — and this deck ended up being the one that took me all the way to Master Ball. A2a-063, A1-089, and A2b-035 might seem like a weird mix at first, but it’s surprisingly good! With multiple attackers, high HP, and flexible game plans, it has one of the highest ceilings in the game when it draws well. If you’re stuck or just want something fresh — and actually fun to play — this might be the pick.
Confused? Let's get right into it.
Strengths & Weaknesses
| Pros | Cons |
| +Multiple avenues to win increases the deck's potential. | - Incredibly inconsistent. Prone to bad hands a lot. |
| + A2a-063 is a wall with 140 HP — and with A2a-074, it swings for 100 with just 2 Energy. | - Takes a lot of adaptation and sequencing to play right. |
| + A3-144 into A1-089 very early is huge — this wasn’t even possible in older metas. | |
| + A2b-035 works as a self-charging backup attacker, especially when A2a-063 isn’t attacking yet. | |
| + When this deck draws well, the ceiling is insane. |
How to Play Snorlax Greninja Giratina ex
This deck is a bit harder to play due to different lines of the deck, but I'll give you the most info I can on my time playing the deck. Ideally, you want to start with A2a-063 to tank. A1-089 as your damage dealer over time, while A2b-035 becomes your backup damage dealer if A2a-063 goes down.
We'll only be playing Water Energy since we want to attack with A1-089 if it arises and want to heal with A2a-072. I can see the merit of running Psychic and Water Energy as well if you want to help A2b-035 have energy too, but most of the time, A2b-035 is your late backup option so you don't really rush things off with A2b-035. You will have a lot of time using Broken-Space Bellow.
Turn 1
If you start with A2a-063:
This is your ideal start — your goal is to hold the board. If you have A2a-074, you can go for the 100 damage swing, but even without it, you’ll still want to attach Energy since Collapse is your long-term plan. Don’t hesitate to attach A3-146 if you expect your opponent to hit into it — the extra chip adds up fast, especially early.
If you start with A1-087:
If you already have the A3-144 + A1-089 combo in hand, you can choose to evolve and apply pressure right away — especially if you think A1-089 attacks will matter. Otherwise, retreating into A2a-063 is usually the better move to protect it and keep activating its Ability. Getting A1-089’s Ability online this early can be game-winning.
If you start with A2b-035:
Not ideal. Use its Ability to grab an Energy, then retreat into A2a-063 if possible. You want to keep A2b-035 safe for later turns where it can clean up — don’t risk it getting KO’d this early.
Early Priorities:
- Get A2a-063 swinging by Turn 2 if you have A2a-074
- Set up the A3-144 + A1-089 combo as soon as possible
- Use A2b-069 if your opening hand bricks — sometimes a reset is your best line
Midgame
By now, you should be swinging — ideally with A2a-063. It should have 2 Energy ready to go with A2a-074, and you’ll want to keep it alive as long as possible using A2a-072 and A2b-070.
- A1-089 pressure builds fast. Once it’s evolved, keep the chip going while continuing to set up A2a-063 and A2b-035. If you started with A1-087 and retreated into A2a-063, you can heal it with A2a-072 by attaching a Water Energy — but it’s usually better to focus your resources on A2a-063 instead.
- A2b-035 charges itself over time. Let it stack Energy until it hits 3, then bring it in when you're behind by 2 points — this is when it becomes most valuable as a comeback EX attacker. Don’t rush it.
- Energy placement matters a lot. If A2a-063 is about to get knocked out, drop an Energy on A1-089 so it can attack next turn — or prep another A2a-063 with A2a-074. Always plan one step ahead.
- Watch your draws. This deck isn’t consistent, so every small decision counts. What you hit with A1-089, how long you stall with A2a-063 — they all affect how the match plays out.
This phase is all about adapting. Some games, A1-089 carries. Other times, A2a-063 walls and slowly cleans up. Know when to pivot and who to invest in.
Endgame
This is where A2b-035 usually shines.
- Bring it out once A2a-063 is down — or ideally when you’re behind by 2 points. That’s when you get the most value out of it as an EX attacker. Just make sure it doesn’t get KO’d too early, or you’ll fall way behind with no solid finisher left.
- Managing healing and point pacing matters here. Sometimes just keeping something alive one more turn is enough to deny your opponent a knockout and swing the tempo back.
- If A1-089 is still up, keep chipping away — especially if your opponent’s resources are thinning out. It’s great for softening up targets for A2b-035 or picking off anything fragile.
- A2-150 becomes huge here. With A1-089’s Ability still active, you can easily take out key threats — even full-HP Pokémon — to close out the game on your terms.
Card Choices
Core
Must-have cards the deck relies on to function.
A2a-063 – Your main tank and early attacker. Most of your Energy will be attached to this, and it's also your primary healing target with A2b-070 or A2a-072. Collapse with A2a-074 is your core game plan.
A1-089 – One of your main damage sources. The earlier you evolve it, the better. Its Ability provides free chip damage, which adds up quickly across the game.
A2b-035 – Backup attacker once A2a-063 goes down or you're behind by 2 points. Charges itself with its Ability. Not something you want active early — save it for when it can swing games.
A3-144 – Enables A1-089 early. It’s the most broken combo in the deck and a big reason why the ceiling is so high.
A2a-074 – The main Supporter you’ll be using with A2a-063. Swinging for 100 very early on is insane pressure and tempo.
A2-150 – Super potent with A1-089 — lets you pull exactly what you need from the Bench when it matters.
A2b-070 – Keeps A2a-063 going and clears Sleep. Another main source of sustain in the deck.
PROMO-005 & PROMO-007 – Core draw engine.
Adjustable
Flexible picks you can tweak based on meta or preference.
A2b-070 – Keeps A2a-063 going and clears Sleep. Another main source of sustain in the deck.
Optional
Cards that can be cut without hurting core consistency.
A2a-072 – Source of sustain. Great for setting up multiple heals, especially if you lead with A1-087 damaged and need to retreat early.
Second A2b-070 – Can be added if you’re running both Psychic and Water Energy to help support A2b-035 better.
A3-146 – Mainly attached to A2a-063 for chip damage. Only running one because of the amount of A3-151.
A2-146 – An alternative to A2b-069 if you’re looking for a specific Pokémon like A2b-035 — lets you start charging Energy right away.
Situational
Techs that only matter in specific matchups.
Extra A3-146 – Increases the chance of starting with it, but isn’t always worth the slot.
A3-066 – Can run as a one-of stall tank, letting you just hit with the A1-089s. Haven’t tested it too much.
Final Thoughts
This deck might not look meta at first glance, but once it starts rolling, it can be brutal.
If you're comfortable adapting each turn and enjoy switching attackers mid-game, this deck rewards smart sequencing and creative plays. It’s fun, flexible, and can catch a lot of players off guard — especially those expecting the usual ranked ladder picks.
If you're stuck in Ultra Ball or just want something different that still punches hard, this deck might be exactly what you need.
You can also check out our other guides for more insights! With the ranked format here, now is the perfect time to master these strategies, climb the leaderboard, and dominate matchups!