Table of Contents
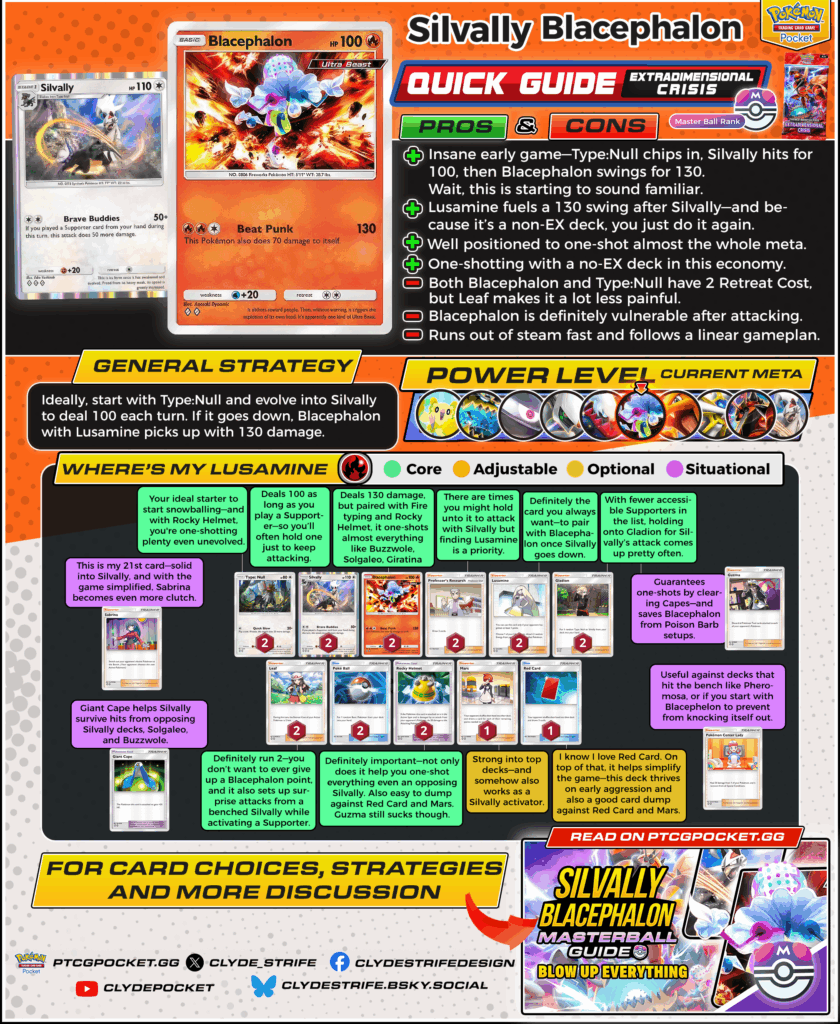
One-shotting everything without using EXs? Yep, it’s real.
A3a-061 A3a-009 is one of the most aggressive non-EX builds in the format, combining consistency with raw damage. It’s built to punish slower decks and take control early—simple, direct, and hard to ignore.
While it’s not the only top-performing non-EX option (A3a-061 A2-089 says hi), this version brings its own unique strengths to the table and has proven itself all the way to Masterball.
Here’s a full breakdown of why it’s rising—and how to get the most out of it.
Strengths & Weaknesses
| Pros | Cons |
| + Insane early game — A3a-060 chips in, A3a-061 hits for 100, then A3a-009 swings for 130. Wait, this is starting to sound familiar. | - Both A3a-009 and A3a-060 have 2 Retreat Cost, but A1a-068 makes it a lot less painful. |
| + A3a-069 fuels a 130 swing after A3a-061—and because it’s a non-EX deck, you just do it again. | - A3a-009 is definitely vulnerable after attacking. |
| + Well positioned to one-shot almost the whole meta. | - Runs out of steam fast and follows a linear gameplan. |
| + One-shotting with a no-EX deck in this economy. |
How to Play Silvally Blacephalon
The core strategy is simple: open with A3a-060, evolve into A3a-061, and start swinging for 100 every turn as long as you play a Supporter. If A3a-061 goes down, follow up with A3a-009, using A3a-069 to recover the Fire Energy discarded earlier—letting you hit for 130 and keep the pressure going.
Early Game
If you start with A3a-060:
This is your ideal starter. It puts on early pressure and sets up A3a-061 to close out games quickly. You also want it to be knocked out eventually, since that gives you the Energy you’ll need for A3a-069 later on.
If you start with A3a-009:
This is the one you don’t want to start with. Its 2 Retreat Cost slows you down, and you’d rather invest Energy into a benched A3a-060. Try to dig for A1a-068 to pivot out cleanly. If you already have A3a-069 in hand, you can consider manually retreating with A3a-009, letting A3a-060 get knocked out, then bringing A3a-009 back powered up. But this route is harder—especially if it took early damage.
If you have A1a-068 and A3a-061 ready:
You can attach Energy to A3a-061 instead. The high Retreat Cost on A3a-009 makes most opponents overlook the threat, so this lets you catch them off guard with a surprise 100 damage swing.
Early Priorities
- Getting A3a-069 online is a big priority. That means you’ll often want to load Energy onto A3a-060 first, just to make sure you have discard fuel later.
- Playing A2-148 early is usually good—it helps thin your hand before disruption cards like PROMO-006 or A2-155 hit. Best target is A3a-061, so A3a-009 can pick off anything that survives with 20 HP left.
- Use PROMO-005 early to search for a second A3a-060—this allows A3a-067 to focus on finding A3a-061 directly.
- If you already have A3a-061 and a stable hand, sometimes it’s best to hold onto PROMO-007. This lets you keep a Supporter in hand to attack with A3a-061 and protects against PROMO-006 or A2-155 resets.
- Same goes for A3a-067—if it’s your only Supporter and you already have another A3a-060, hold it so A3a-061 stays active each turn. If you don’t have another A3a-060, it’s still often worth the risk, since you can’t rely on topdecks for Supporters.
- As mentioned in my other guides: if you’re planning to reset your hand, it’s often smart to bait a PROMO-006, A2b-069, or A2-155. Keep your hand at four or more if you’re okay with a reset, and below three if you want to avoid one.
- PROMO-006 is best played turn 1 when going first, especially to slow your opponent’s access to key cards like PROMO-007 or A3-144. Other than that, hold it if your opponent is bricking or wait until they play PROMO-007 or draw into 5+ cards.
- A2-155 is flexible—it can be effective later, but if you’re facing another Rare Candy deck, it’s usually correct to play it Turn 1. In those matchups, use A2-155 early to disrupt their ability to find pieces. Although if you have limited Supporters, I recommend holding into it more so you have something to activate for Silvally later.
Midgame
- If A3a-061 already has 2 Energy, the next best move is to start charging another A3a-060. If you feel A3a-009 is needed sooner, shift Energy into it instead.
- Once A3a-061 is set up, just keep playing Supporters every turn to maintain the 100 damage. If you’re low on draw, hold onto A3a-067—it's often your backup plan. You’ll sometimes burn through cards like A1a-068 or A2-155 just to keep A3a-061 attacking.
- This deck often wins or loses based on how many threats your opponent can put down. You don’t want to play a long game—A3a-009 is left with 30 HP after attacking, which makes it incredibly easy to pick off. The goal is to outpace the opponent before they stabilize.
- Since A3a-009 is so vulnerable post-attack, think carefully about which attacker to send in. In many cases, it’s safer to give up a A3a-061 first. But if your opponent drops something like a high-HP A2b-010 that can heal, you may need to swing with A3a-009 to weaken it significantly. Gauge how much healing or HP you need to break through—this helps decide your attacker sequence better.
Bonus Tip:
Always keep in mind that retreating fuels A3a-069 too—so if you need to bring in A3a-009 immediately, you can manually retreat something as long as you’ve already had a knockout.
Card Choices
Core
Must-have cards the deck relies on to function.
- A3a-060 – Your ideal starter to start snowballing—and with A2-148, you're one-shotting plenty even unevolved.
- A3a-061 – Deals 100 as long as you play a Supporter—so you’ll often hold one just to keep attacking.
- A3a-009 – Deals 130 damage, but paired with Fire typing and A2-148, it one-shots almost everything like Buzzwole, Solgaleo, Giratina, etc.
- A3a-069 – Definitely the card you always want—to pair with A3a-009 once A3a-061 goes down.
- A1a-068 – Definitely run 2—you don’t want to ever give up a A3a-009 point, and it also sets up surprise attacks from a benched A3a-061 while activating a Supporter.
- A2-148 – Definitely important—not only does it help you one-shot everything, even an opposing A3a-061. Also easy to dump against PROMO-006 and A2-155. A3-151 still sucks though.
- A3a-067 – With fewer accessible Supporters in the list, holding onto this for A3a-061’s attack comes up pretty often.
- PROMO-007 – There are times you might hold onto it to attack with A3a-061, but finding A3a-069 is a priority.
- PROMO-005 – Card draw engine.
Optional
Cards that can be cut without hurting core consistency.
- PROMO-006 – Helps simplify the game—this deck thrives on early aggression and also works well as a card dump against itself and A2-155.
- A2-155 – Strong into top decks—and somehow also works as a A3a-061 activator.
Situational
Techs that only matter in specific matchups.
- A1-225 – The 21st card—solid into A3a-061, and with the game simplified, becomes even more clutch.
- A2-147 – Helps A3a-061 survive hits from opposing Silvally decks, Solgaleo, and Buzzwole.
- A3-151 – Guarantees one-shots by clearing Capes—and saves A3a-009 from Poison Barb setups.
- A2b-070 – Useful against decks that hit the bench like Pheromosa, or if you start with A3a-009 to prevent it from knocking itself out.
Final Thoughts
A3a-061 A3a-009 is fast, aggressive, and thrives in simplified board states. It stands alongside Rampardos as one of the top Silvally decks, but it’s easily one of the most consistent at punishing slow setups and closing games fast.
You can also check out our other guides for more insights! With the ranked format here, now is the perfect time to master these strategies, climb the leaderboard, and dominate matchups!