Table of Contents
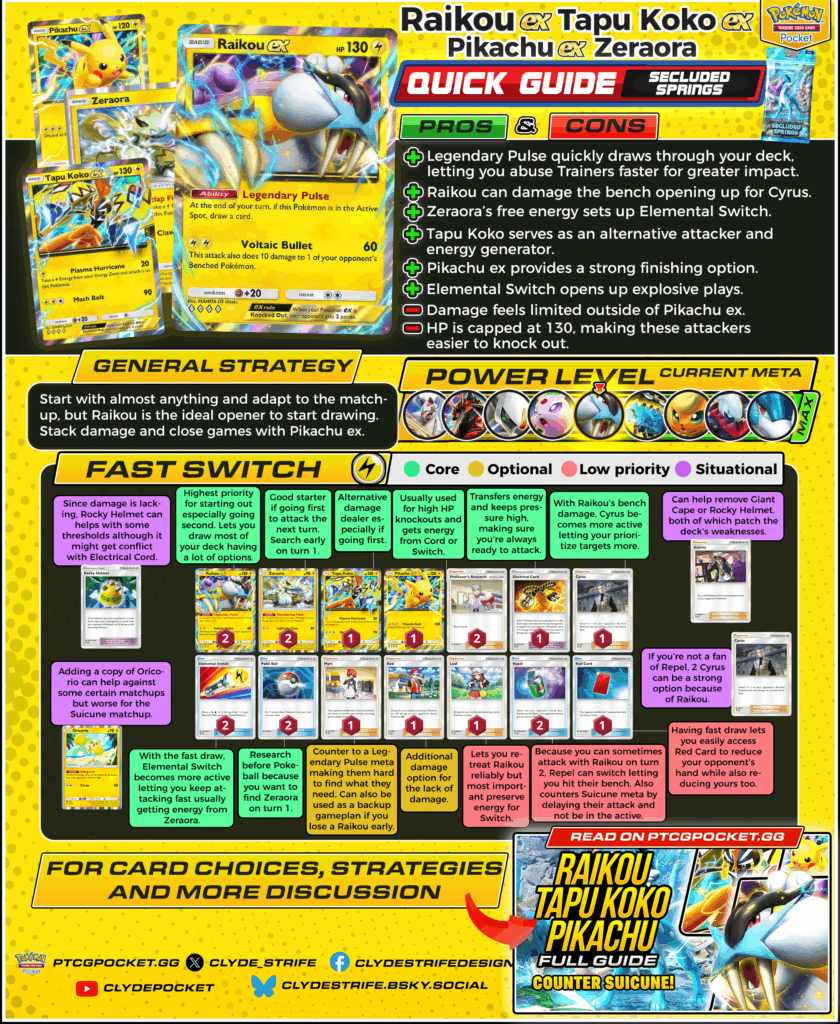
A4a-025's Legendary Pulse easier card draw gives you instant access to crucial trainers when you need them most, allowing for game-changing plays on demand. Combined with the deck's ability to quickly pivot between powerful attackers like A2b-022, A3a-019, and A3a-021, this immediate trainer access creates an overwhelming tempo advantage that can catch opponents completely off guard. It is one of the stronger counters against A4a-020 due to its Lightning advantage so have this in your arsenal if you're looking to beat those pesky A4a-020.
Fast Switch!
Strengths & Weaknesses
| Pros | Cons |
| + Legendary Pulse quickly draws through your deck, letting you abuse Trainers faster for greater impact. | - Damage feels limited outside of Pikachu ex. |
| + A4a-025 can damage the bench opening up for A2-150. | - HP is capped at 130, making these attackers easier to knock out. |
| + A3a-021's free energy sets up Elemental Switch. | |
| + A3a-019 serves as an alternative attacker and energy generator. | |
| + A2b-022 provides a strong finishing option. | |
| + A4-151 opens up explosive plays. |
How to Play Raikou ex Tapu Koko ex Pikachu ex Zeraora
Start with almost anything and adapt to the matchup, but A4a-025 is the ideal opener to start drawing. Stack damage and close games with A2b-022.
Turn 1 Breakdown
If starting with A4a-025: While there's no needed starter, A4a-025 is usually the highest priority especially going second to make use of Legendary Pulse and begin drawing cards immediately, letting you have access to most of your Trainers right away.
If starting with A3a-019: Decent starter whether going first or second but generally better going first since it can attack right away. As for going second, the debate between A4a-025 is if the 20 + 90 damage is securing a threshold as opposed to double 60 by A4a-025.
If starting with A3a-021: Good starter going first since it can attack the next turn if you don't have A3a-019 but can also transition to A4a-025 if you have A1a-068 and A4-151.
If starting with A2b-022: Will retreat into another Pokémon since you will only use it later on for surprise knockouts.
Early Game
- Highest priority on turn 1 is finding A3a-021 since that is the only time you can activate its ability. Benching 2 can be really strong when paired with the 2 A4-151 later on.
- Because of the early reliance on A3a-021 on turn 1, it is generally better to play PROMO-007 first before PROMO-005 to maximize chances of finding more basics if you draw them from Research.
- If you started with A4a-025, A3a-021 and A4-151, you have the option of transferring the energy from A3a-021 to A4a-025 letting it attack the next turn. If you also have A1a-068, you can retreat the A3a-021 for free then transfer with A4-151.
- If you started with A4a-025, A3a-021 and A4-151 while going second, you can retreat A3a-021 right away for A4a-025 so that it can draw but that is if you value the draw more than A4-151 so it's not always optimal.
- Priority for energy is usually just A4a-025 or A3a-019 since they're the most reliable attackers and then spreading it towards the others like A2b-022.
- Since you will be drawing a lot of cards early on, your hand starts to get full making you vulnerable to hand disruptors such as PROMO-006 and A2-155 but since most of the cards are also Trainers especially Items, you can reliably play them just to reduce your hand if you think they won't have much bigger value later on such as PROMO-006 and A3a-064.
- A3a-065 should be strategically placed on the Pokemon you are willing to get knocked out so that it could spread to the other Pokemon.
- While benching Pokemon is important to prevent hand disruption, have a space for Pokemon you might need later on especially A2b-022.
- As mentioned in my other guides: if you're planning to reset your hand, it's often smart to bait a PROMO-006, A2b-069, or A2-155. Keep your hand at four or more if you're fine with a reset, and below three if you want to avoid one.
Midgame Strategy
- Keeping tempo up and securing knockouts in a few turns is one of the deck's strengths especially with the help of A4-151 letting you transfer energy between attackers making sure you always pressure your opponent.
- A3a-064 can be powerful to play in the early game to delay your opponent who is trying to gain energy while you're gaining energy yourself. It can also allow for surprise knockouts especially if you are able to gain energy for any of your attackers right away, A4a-025 can easily take down 60 HP on the bench.
- It is very important to make energy allotments spread throughout most of your Pokemon so that in case the active one gets knocked out, the next one can easily attack.
- The biggest decision in the midgame is when to switch out your Pokemon in the active with A3a-064 or A2-150 so planning your target priorities can be extremely important especially that damage is limited.
Late Game
- The biggest decision in the late game is the transfer of A4-151 between attackers especially towards A2b-022 since with its high damage ensures you a sure knockout which can be crucial for final points so always preserve A4-151 whether it's for tempo or final push.
- Usual receiver of A3a-065 is A2b-022 because of its one shot potential. The presence of A2b-022 will also let your opponent play more carefully since they know you can one shot them anytime with the help of A3a-065 so use this hidden buff to your advantage.
- A2-150 is an incredibly powerful card in the deck due to how you can just pick any target from your opponent, so set this up with the highest threat from your opponent and take it down.
Board Management
A key decision with this deck is figuring out which four Pokemon will make up your board. Since we have 6 Pokemon by default, we will have to decide which 4 Pokemon we should go for while also acknowledging reducing hand size.
- 1 A4a-025, 2 A3a-021, 1 A2b-022 – This is the perfect scenario especially if you started with double A3a-021 since it ensures you have A4a-025 dealing damage in the front while the energy from A3a-021 can easily transfer to A2b-022 for any high threat from your opponent. This is also most likely the board that you will be using if you are dealing with A3-066.
- 1 A4a-025, 1 A3a-021, 1 A3a-019, 1 A2b-022 – Most of the time your average board especially if you only started with 1 A3a-021.
- 2 A4a-025, 1 A3a-019, 1 A2b-022 – If you haven't started with A3a-021 at all, it might not be worth it to put on the board anymore unless you're just trying to reduce hand size.
Beating Suicune
With the abundance of A4a-020 in the meta, this is how to win against A4a-020 A1-089 deck.
- You can reliably start with anything except for A2b-022 as they can 2 shot a A4a-020 due to its weakness against Lightning. A4a-025 is the most recommended due to the added draw.
- If you started with A3a-021 and A4a-025 with A4-151, it is one of the stronger plays you can do going first letting A4a-025 hit right away.
- If you go first, you're at a disadvantage if they started with A4a-020 since they can attack first to your Pokemon, it might be better to charge a Pokemon on the bench instead. Using A3a-064 can be powerful here since this lets you swap their active making you attack first instead since they'll have to waste energy to retreat.
- A2b-022 can be your surprise finisher with the help of getting energy from A4-151 if you're after the final point whether to use A2-150 or A3a-064 to target an easier knockout.
How to Play Red Card & Mars
If You’re Going First
- Against non–Stage 2 decks:
Using Red Card right away is fine if you need to reduce your hand. Otherwise, wait for them to build a bigger hand or combo with Silver. - Against Stage 2 decks:
You can play it early, but since its since they can't evolve yet this turn it’s stronger on the next turn and they’re more likely to have Rare Candy or draw Supporters in hand.
If You’re Going Second
- Against non-Stage 2 decks:
Same logic—play early to limit their options. - Against non-Stage 2 decks:
Recommended to play since this is your best chance to stop them from finding Rare Candy or evolutions.
Mars Tips
A2-155 becomes stronger later in the game. You can be more conservative early on and play it once you know a Pokémon will get KO’d to increase its impact.
Card Choices
Core
Must-have cards the deck relies on to function.
- A4a-025 - Highest priority for starting especially going second. Lets you draw most of your deck having a lot of options.
- A3a-019 - Alternative damage dealer especially if going first.
- A2b-022 - Usually used for high HP knockouts and gets energy from Cord or Switch.
- A3a-021 - Good starter if going first to attack the next turn. Search early on turn 1.
- A2-150 - With A4a-025's bench damage, A2-150 becomes more active letting you pressure multiple targets more.
- A3a-065 - With the fast draw, A4-151 becomes more active letting you keep attacking fast usually getting energy from A3a-021.
- PROMO-005 - Research before Pokeball because you want to find A3a-021 on turn 1.
- PROMO-007 - Core draw engine.
Optional
Cards that can be cut without hurting core consistency.
- A2-155 - Counter to a Legendary Pulse meta making them hard to find what they need. Can also be used as a backup gameplan if you lose a A4a-025 early.
- A2b-071 - Additional damage option for the lack of damage.
- A1a-068 - Lets you retreat A4a-025 reliably but most important preserve energy for Switch.
- A3a-064 - Because you can sometimes attack with A4a-025 on turn 2, A3a-064 can switch letting you hit their bench. Also counters A4a-020 meta by delaying their attack and not be in the active.
- PROMO-006 - Having fast draw lets you easily access PROMO-006 to reduce your opponent's hand while also reducing yours too.
Situational
Techs that only matter in specific matchups.
- A2-148 - Since damage is lacking, A2-148 can help with some thresholds almost might get conflict with A3a-065.
- A2-150 (another copy) - If you're not a fan of A3a-064, 2 A2-150 can be a strong option because of A4a-025.
- A3-066 - Adding a copy of A3-066 can help against some certain matchups but worse for the A4a-020 matchup.
- A3-151 - Can help remove A2-147 or A2-148, both of which patch the deck's weaknesses.
Final Thoughts
The A4a-025 deck thrives on speed and versatility, using Legendary Pulse to access the right tools at the right time. Master your energy transfers with A4-151, prioritize A3a-021 on turn 1, and don't hesitate to pivot between attackers based on matchup needs. Against A4a-020 decks, your Lightning advantage gives you a significant edge when played aggressively.
You can also check out our other guides for more insights! With the ranked format here, now is the perfect time to master these strategies, climb the leaderboard, and dominate matchups!