Table of Contents
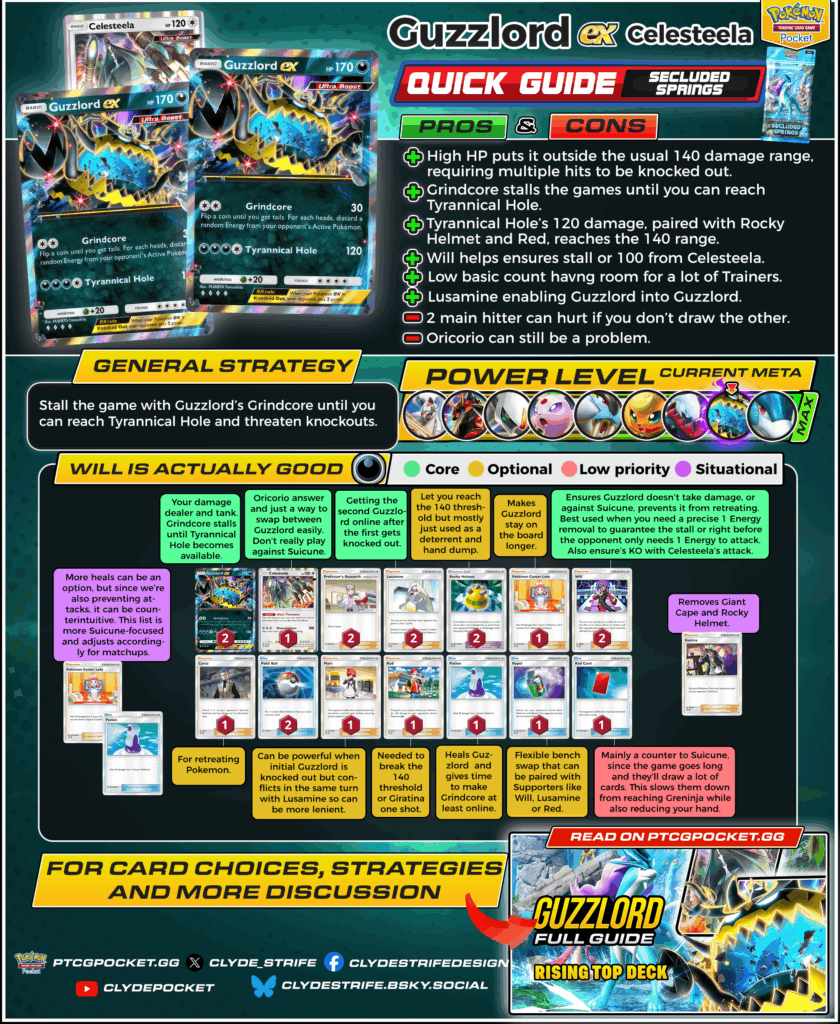
A3a-043 is emerging as the next powerhouse deck poised to challenge A4a-020's dominance at the top. With its massive HP walls, relentless Grindcore pressure, and the game-changing synergy with A4-156 for guaranteed disruption, this deck represents a seismic shift in how the game is played with just 2 Pokemon. As tournament results continue to showcase its ability to outgrind even the most consistent decks, A3a-043 is quickly establishing itself as one of the decks to beat.
Get ready to get Grindcored!
Strengths & Weaknesses
| Pros | Cons |
| + High HP puts it outside the usual 140 damage range, requiring multiple hits to be knocked out. | - 2 main hitter can hurt if you don't draw the other. |
| + Grindcore stalls the games until you can reach Tyrannical Hole. | - A3-066 can still be a problem. |
| + Tyrannical Hole's 120 damage, paired with Rocky Helmet and Red, reaches the 140 range. | |
| + A4-156 helps ensures stall or 1 KO from A3a-062. | |
| + Low basic count having room for a lot of Trainers. | |
| + A3a-069 enabling A3a-043 into A3a-043. |
How to Play Guzzlord ex
Stall the game with Guzzlord’s Grindcore until you can reach Tyrannical Hole and threaten knockouts.
Turn 1 Breakdown
If starting with A3a-043: Since we're only running 2 Pokemon, you're almost guaranteed to start with A3a-043 most of the time and the ideal opener. Attach energy so you can start using Grindcore.
If starting with A3a-062: Try to find A3a-043 as you can so you can still attach energy unto it but if not, you have to stick with attaching energy into A3a-062.
Early Game
- While this isn't as obvious, there are matchups you have to avoid playing A3a-062 on the board especially decks that lean towards swapping the bench like A4a-020 A1-089. This is because they become vulnerable to A2-150 letting you give up a point. It's much better for the enemy to take on 2 A3a-043 for points since they're higher HP.
- If you started with A3a-062, try to make sure A3a-062 isn't damaged so that it won't be in A2-150 range.
- If you have the other A3a-043 in hand but don't have A3a-062, don't play the other A3a-043 right away so that it won't be vulnerable to an early A3a-064 or A1-225.
- Attach energy into A3a-043 to be able to make use of Grindcore.
- Since your hand will get large to drawing a lot of Trainers, try to play as much as you can to reduce your hand such as A2-148, PROMO-006 or PROMO-001 if you took damage. Depending on the matchup, you might hold onto your other Pokemon.
- As mentioned in my other guides: if you're planning to reset your hand, it's often smart to bait a PROMO-006, A2b-069, or A2-155. Keep your hand at four or more if you're fine with a reset, and below three if you want to avoid one.
Midgame Strategy
- Playing your heal early on to recover from damage is an ok play to reduce hand especially if you don't plan to play other Supporters.
- Depending on what you're facing on the active especially if it's an attack that needs 2 or more energy, once they already have 1 energy, you have to consider if it's worth using A4-156 with Grindcore to ensure the enemy isn't able to attack. This slows down your opponent significantly letting you buy more turns to use Tyrannical Hole.
- If you're playing from behind or the initial A3a-043 is about to get knocked out, strategy shifts and have to start attaching energy into the other A3a-043. This way, you can attack with the other A3a-043 at least with Grindcore if the other one gets knocked out, if you have A3a-069, it also enables you to use Tyrannical Hole too letting you have a stronger comeback.
- If you already have 3 energy into the initial A3a-043 while can't oneshot with Tyrannical Hole or purposely not doing so, attaching energy into the other A3a-043 is important so that it has access to Tyrannical Hole with A3a-069.
- Intentionally not knocking out your opponent's active Pokemon is a solid gameplan if you are fearing a A2-155 and losing A3a-069, this is why putting at least 1 energy into the other A3a-043 can be important so that in case you lose your initial A3a-043, the other one can at least use Grindcore.
Late Game
- A3a-043 with 4 energy is able to use Tyrannical Hole letting you take games with its high damage that and reach higher thresholds with damage from A2-148 and A2b-071.
- The other A3a-043 in the board should have at least 1 energy to be able to use Grindcore or Tyrannical Hole with A3a-069.
- Play Trainers in order to secure knockouts such as A2b-071 or A2-150. With the help of A3a-064, you can also combine these with Supporters.
Beating Suicune
With the abundance of A4a-020 in the meta, this is how to win against A4a-020 A1-089 deck.
- As mentioned above, it's much more important here to only play A3a-043 and never put A3a-062 on the board to avoid A1-089 ping.
- Have at least one energy on the other A3a-043 if you can so if the active one gets knocked out, you can easily use the other one either with Grindcore or Tyrannical hole with A3a-069.
- Holding off on PROMO-006 and A2-155 until they can get a larger hand up to 5 or 6 cards is ok especially if they don't have A1-087 yet but if they have A1-087, you might need to be more aggressive on playing PROMO-006 since you want to delay their A1-089 as much as possible.
- Locking down with A4-156 is a solid strategy to use. This means once A4a-020 has one energy on the active, using A4-156 so that it can't also retreat until you can get into Tyrannical Hole which you can knockdown the A4a-020.
- Once a A4a-020 is taken down, they will try to retaliate with a A2b-035 so as long as you have A3a-069, you can easily take A2b-035 down with your other A3a-043.
- If they retaliate with the other A4a-020, you can still damage it with A3a-069 even if you don't get to knock it down and they won't be able to one shot the other A3a-043.
- A3a-064 can also be effective here if they have lower HP on the bench such as A1-089 letting you just swap their A4a-020 to take down an easier target instead.
- If they are playing A3-066, you will have to be forced to play A3a-062 and put energy into it. Putting A2-148 unto it can be important so that if they pull A3a-062 with A2-150, you then take down the Pokemon they use to attack, it's important that you can use Tyrannical Hole here. If they bring A3-066 back then you use A3a-064 to do the final hit or least damage for A2-150 later on.
Dealing with Oricorio
Oricorio is still a hard matchup especially double copies but here is the best strategy going into it.
- It's important A3a-062 isn't damaged here so that it won't be pulled by A2-150.
- Tank with A3a-043 first and put energy until you can use Grindcore to remove energy from A3-066 as much as you can and slow down your opponent.
- You will now be forced on playing A3a-062 on board and put energy into it.
- Holding off onto A4-156 is important to make sure A3a-062 takes down A3-066 not relying on RNG.
- If they try to snipe A3a-062, take down the Pokemon they used to hit with A3a-043. Having energy to use Tyrannical Hole can be useful so that you get the points.
- If they bring back A3-066, having A3a-064 to switch it off to take the final points can be important.
Card Choices
Core
Must-have cards the deck relies on to function.
- A3a-043 - Your damage dealer and tank. Grindcore stalls until Tyrannical Hole becomes available.
- A3a-062 - A3-066 answer and just a way to swap between A3a-043 easily. Don't really play it against A4a-020.
- A3a-069 - Getting the second A3a-043 after the first gets knocked out.
- A2-148 - Let you reach the 140 threshold but mostly just used as a deterrent and hand dump.
- A4-156 - Ensures A3a-043 doesn't take damage or against A4a-020, prevents it from retreating. Best used when you need a precise 1 Energy removal to guarantee the stall or right before the opponent only needs 1 Energy to attack. Also ensures a KO with A3a-062's attack.
- PROMO-005 and PROMO-007 - Core draw engine.
Optional
Cards that can be cut without hurting core consistency.
- A2b-070 - Makes A3a-043 stay on the board longer.
- A2-150 - For retreating Pokemon.
- A2-155 - Can be powerful when initial A3a-043 is knocked out but conflicts in the same turn with A3a-069 so can be more lenient.
- A2b-071 - Needed to break the 140 threshold or A2b-035 one shot.
- PROMO-001 - Heals A3a-043 and gives time to make Grindcore at least online.
- A3a-064 - Flexible bench swap that can be paired with Supporters like A4-156, A3a-069 or A2b-071.
- PROMO-006 - Mainly a counter to A4a-020 since the game goes long and they'll draw a lot of cards. This slows them down from reaching A1-089 while also reducing your hand.
Situational
Techs that only matter in specific matchups.
- A2b-070 and PROMO-001 - More heals can be an option, but since we're also preventing attacks, it can be counterintuitive. This list is more A4a-020-focused and adjusts accordingly for matchups.
- Guzma - Removes Giant Cape and Rocky Helmet.
Final Thoughts
Guzzlord is finally the deck to beat and hope you master the deck with this guide!
You can also check out our other guides for more insights! With the ranked format here, now is the perfect time to master these strategies, climb the leaderboard, and dominate matchups!