Table of Contents
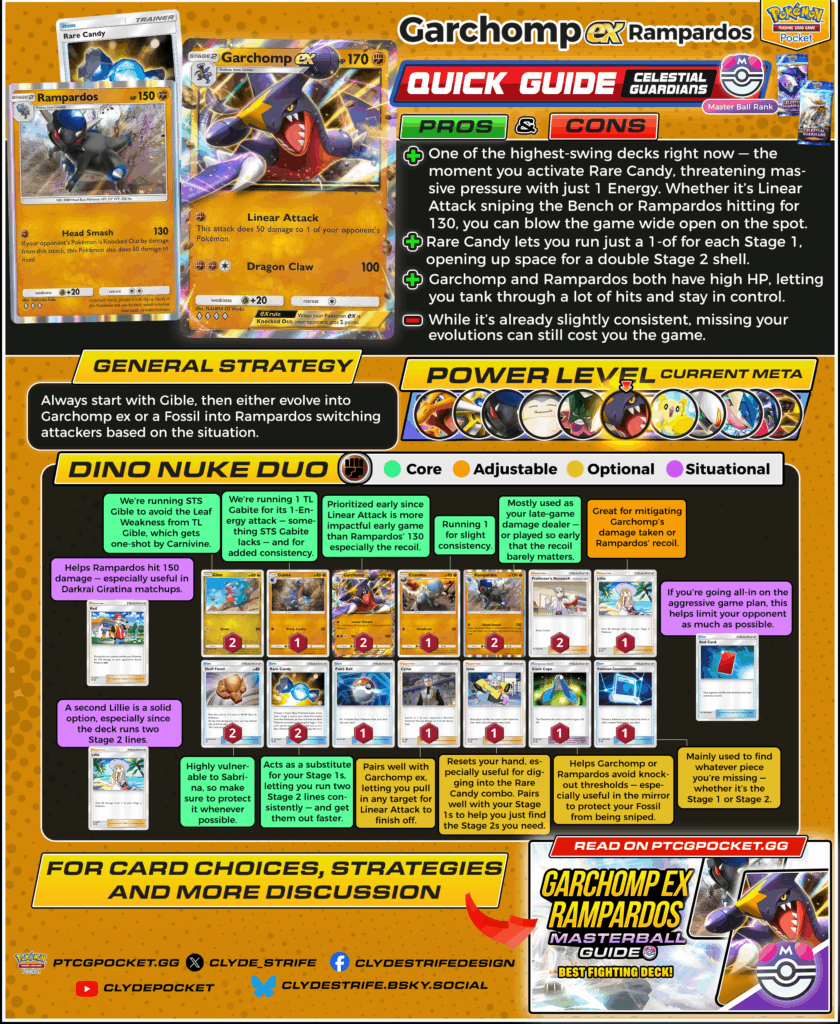
A2a-047 & A2-089 is one of the highest-swing decks to come out of Celestial Guardians. With A3-144 enabling a double Stage 2 setup, you can apply pressure early and shift win conditions on the fly with low retreat costs. Whether you're sniping the Bench or going for raw power, this deck has the tools to dominate fast-paced matchups and close out games quickly.
Dino nuke duo, let's go!
Strengths & Weaknesses
| Pros | Cons |
| +One of the highest-swing decks right now — the moment you activate A3-144, you’re threatening massive pressure with just 1 Energy. Whether it’s A2a-047 sniping the Bench or A2-089 hitting for 130, you can blow the game wide open on the spot. | - While it’s already slightly consistent, missing your evolutions can still cost you the game. |
| + A3-144 lets you run just a 1-of for each Stage 1, opening up space for a double Stage 2 shell. | |
| + A2a-047 and A2-089 both have high HP, letting you tank through a lot of hits and stay in control. |
How to Play Garchomp ex Rampardos
Start with A2-121 — it’s your only Basic — and evolve into either A2a-047 or A2-089, depending on what you need. A2a-047 offers early chip damage with Linear Attack and excellent target control, eventually ramping up to 100 damage. A2-089, on the other hand, hits for a flat 130 — perfect for taking early prizes or closing out games later.
Turn 1:
- Since you’ll always start with A2-121, your top priority is evolving into A2a-047 as soon as possible. That usually means finding A3-144 and going straight to A2a-047, or evolving through A2a-046 if needed. But if you already have A2-089 and A3-144 in hand, don’t hesitate — go for it and apply pressure fast. If you’re also close to evolving into A2a-047 manually, take a moment to assess whether it’s worth waiting based on the matchup.
- When deciding whether to evolve into A2a-047 or A2-089, assess the board. If sniping the Bench matters more — such as in the mirror match where hitting the opponent’s A2-144 early is key — then A2a-047 is the better option. But if you’re up against high-HP threats like A2-110, A2-089 is usually the stronger play, especially since it won’t take recoil damage if it can’t secure a knockout yet.
- If you don’t have A3-144 yet, play A2b-069 early — especially if you’re missing PROMO-007. In fact, it’s sometimes worth building up a large hand just to bait a PROMO-006 or A2-155 from your opponent. You want to dig hard to hit the Rare Candy line and avoid falling behind.
- If you already have A2a-046, evolve A2-121 before using A2b-069 — that way, you’re only digging for A2a-047. Same goes for A2-088: evolve A2-144 first before shuffling your hand to focus your search for A2-089.
- Only use A2-147 if you expect your Pokémon or A2-144 to be knocked out soon or if you’re anticipating a hand disruption like A2-155 or PROMO-006.
- Always attach Energy to A2-121 or A2a-046 first — this gives you the option to power up A2a-047’s 3-Energy attack when needed.
Midgame & Closing Strategy
- Once you're set up, your ideal board has A2a-047 applying pressure while A2-089 builds in the back. As mentioned earlier, there will be times when A2-089 is the only line you can evolve — and that's totally viable, especially if the recoil won’t matter much. If it can survive the next turn and take out another threat, it’s done its job. Trading A2-089 for two knockouts is already a solid position to be in.
- A2-146 should be used to grab whichever piece you’re missing. For example, if you’re evolving into A2a-047 with A3-144, use A2-146 to search for A2-088 to follow up with the Fossil. The reverse also works — if you’re going A2-089 first, Communication can grab the Garchomp line.
- Use A2-147 and A3-155 to survive key turns or protect your setup — especially after a big swing or when you're holding tempo.
- A2-150 is best saved for your final push. Whether it’s clearing the Bench for a clean knockout or setting up Linear Attack to finish something off, you want to time it just before the game ends.
- Keep in mind that A2a-047 gives up 2 points, while A2-089 only gives 1. If A2a-047 goes down, you can’t afford to let even A2-089 get knocked out afterward. So managing your point path matters. There will be rare games where you might need to give up A2-121 first, then A2-089, before committing to A2a-047 — or go double A2-089 first, then finish with Garchomp. It doesn’t come up often, but it’s something to be aware of when planning your endgame.
Card Choices
Core
Must-have cards the deck relies on to function.
- A2-121
We’re running STS Gible to avoid the Leaf Weakness from TL Gible, which gets one-shot by Carnivine. - A2a-046
We’re running 1 TL Gabite for its 1-Energy attack — something STS Gabite lacks — and for added consistency. - A2-088
Stage 1 of Rampardos. Running 1 for slight consistency. - A2a-047
One of your main attackers. Prioritized early since Linear Attack is more impactful early game than Rampardos’ 130 — especially with the recoil. - A2-089
The deck’s raw power threat. Deals 130 for just 1 Energy. Perfect for sniping threats that Garchomp can’t reach or for pushing tempo when the recoil doesn’t matter. - A3-144
The engine that makes the double Stage 2 shell work. Allows you to skip Stage 1s, which is what makes this deck even possible. - A2-144
Prerequisite to Rampardos. Highly vulnerable to A1-225, so make sure to protect it whenever possible. - PROMO-007
Core draw engine. - PROMO-005
Only running 1 since we just need to find the other Gible — running 2 may lead to brick draws.
Adjustable
Flexible picks you can tweak based on meta or preference.
- A3-155 – Great for mitigating A2a-047’s damage taken or A2-089’s recoil.
Optional
Cards that can be cut without hurting core consistency.
- A2-147 – Helps A2a-047 or A2-089 avoid knockout thresholds — especially useful in the mirror to protect A2-144 from being sniped.
- A2b-069 – Resets your hand, especially useful for digging into the A3-144 combo. Pairs well with your Stage 1s to help you just find the Stage 2s you need.
- A2-146 – Mainly used to find whatever piece you’re missing — whether it’s the Stage 1 or Stage 2.
- A2-150 – Pairs well with A2a-047, letting you pull in any target for Linear Attack to finish off.
Situational
Techs that only matter in specific matchups.
- A3-155 (extra copy) – A second copy is a solid option, especially since the deck runs two Stage 2 lines.
- A2b-071 – Helps A2-089 hit 150 damage — especially useful in A2-110 + A2b-035 matchups.
- PROMO-006 – If you’re going all-in on the aggressive game plan, this helps limit your opponent as much as possible.
Final Thoughts
Garchomp ex Rampardos is one of the most explosive decks you can bring into Ranked right now. With just one A3-144, you're instantly threatening major swings through either precision sniping or raw damage. Its ability to pivot between A2a-047 and A2-089 gives it flexibility that most Stage 2 decks don't have, and the streamlined 1-of Stage 1 line keeps things lean without sacrificing power.
It rewards clean sequencing, point management, and knowing when to commit to either win condition. If you're looking for a deck that high-rolls hard but still feels skillful when piloted well, this is easily one of the best picks in Celestial Guardians.
You can also check out our other guides for more insights! With the ranked format here, now is the perfect time to master these strategies, climb the leaderboard, and dominate matchups!