Table of Contents
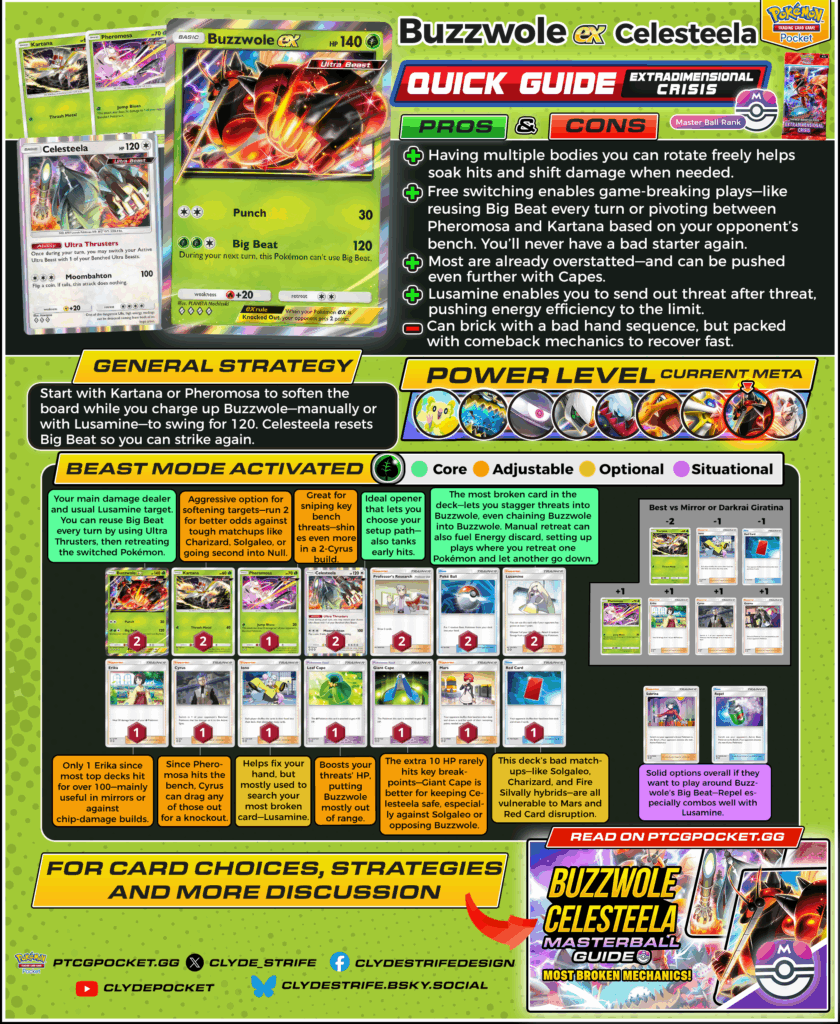
One of the scariest decks in the current meta, A3a-006 with A3a-062. This build applies threat-after-threat pressure while abusing some of the most broken mechanics available. With constant free switching, overstatted attackers, and unmatched momentum, it forces opponents to respond perfectly—or crumble fast.
Beast mode activated!
Strengths & Weaknesses
| Pros | Cons |
| + Having multiple bodies you can rotate freely helps soak hits and shift damage when needed. | - Can brick with a bad hand sequence, but packed with comeback mechanics to recover fast. |
| + Free switching enables game-breaking plays—like reusing Big Beat every turn or pivoting between A3a-007 and A3a-008 based on your opponent’s bench. You’ll never have a bad starter again. | |
| + Most are already overstatted—and can be pushed even further with A2-147 or A3-147. | |
| + A3a-069 enables you to send out threat after threat, pushing energy efficiency to the limit. |
How to Play Buzzwole ex
This deck thrives on flexibility and pressure. With multiple good attackers or option and constant free switching, you can adapt to nearly any board state while forcing your opponent into awkward positions. There are a lot of nuances to understand how the deck works and Ill try my best to explain.
Pre-Turn 1
Before the game starts while choosing your Pokémon, A3a-062 is definitely the starter you want to open with so you can decide what to bring out. But if you don’t have access to A3a-062 and are given the option between A3a-008 or A3a-007, I recommend waiting to see how many Pokémon your opponent sets up so you’ll know whether to attack with A3a-007.
Turn 1 Breakdown
- A3a-062 – The best opener since it lets you choose what to bring out. You can decide depending on the matchup whether to go with A3a-008 or A3a-007. If you don’t want either of them taking damage, A3a-062 can soak hits first—especially when the extra HP doesn’t matter, like against high-damage decks such as A2b-010.
- A3a-008 – Mostly your reliable starter since it doesn’t rely on the opponent having a bench, letting you deal 40 damage right away.
- A3a-007 – Best when the opponent has an important benched Pokémon you want to hit, especially if you already have A2-150 in hand. Strong in the mirror since it weakens A3a-006 into 120 HP range, making it easier to one-shot.
- A3a-006 – Not a preferred starter since you don’t want it to take damage. But if you already have another A3a-006 and A3a-069, it’s actually a good strategy—start with this, threaten 120 damage later, and if it gets KO’d, you already have the other A3a-006 ready.
Early Priorities
A3a-069 will definitely dictate how you play the early turns. If you have it, you can even retreat manually to discard Energy for A3a-006 later, which is something you want to plan ahead for. Always remember—you need something knocked out before you can use the card.
- If you don’t have A3a-069 –
- Assess whether you need the damage from A3a-008 or A3a-007. There are times you’re better off putting Energy on A3a-006 right away, especially if you can’t knock anything out and don’t have A3a-069. This also sets up a future dual A3a-006–A3a-069 play while avoiding giving up a point—an important part of the deck’s strategy.
- If you have A3a-069 –
- You’re in a much better position. You can freely put Energy on A3a-008 or A3a-007 and start hitting without worrying about A3a-006 later on.
- If you want to switch between A3a-008 and A3a-007, one play is retreating the other manually so that if your active gets KO’d, A3a-006 gains 2 Energy from A3a-069.
- After putting one Energy on A3a-008 or A3a-007, A3a-006 is definitely the next to charge so if the active Pokémon gets knocked out, you can gain another Energy from Lusamine and use Big Beat right away.
- If you also have another A3a-006, you have the option to switch your active into your current A3a-006. If that one gets KO’d, you bring out the other and use A3a-069.
- One play you can do—though a bit more rare—is to retreat A3a-006 manually to discard Energy, then let A3a-008 or A3a-007 get knocked out to activate A3a-069 and hit Big Beat. It doesn’t come up often, but it’s a good example of how to make the most out of A3a-069.
- A2b-069 is a good way to reset your hand if you don’t have A3a-069—since A3a-069 is the card that lets you stagger A3a-006 plays consistently.
- Switching your Pokémon around using A3a-062 is an option to tank hits and conserve points.
- As mentioned in my other guides: if you’re planning to reset your hand, it’s often smart to bait a PROMO-006, A2b-069, or A2-155. Keep your hand at four or more if you’re okay with a reset, and below three if you want to avoid one.
- PROMO-006 is best played turn 1 when going first, especially to slow your opponent’s access to key cards like PROMO-007 or A3-144. Other than that, hold it if your opponent is bricking or wait until they play PROMO-007 or draw into 5+ cards.
- A2-155 is flexible—it can be effective later, but if you’re facing another Rare Candy deck, it’s usually correct to play it Turn 1. In those matchups, use A2-155 early to disrupt their ability to find pieces.
Midgame
- By midgame, A3a-006 should be ready to use Big Beat—either by gaining Energy from A3a-069 or through manual attachments. As mentioned earlier, it’s important to decide if giving up your active is worth it, since you can't afford to lose A3a-006 anymore.
- One of the most important things to manage is your 4 Pokémon on board. If you’re going for the dual A3a-006 play, you’ll want space for 2 A3a-006, A3a-062, and either A3a-008, A3a-007, or another A3a-062. Still, keep your options open—you might need A3a-007’s 20 bench damage later or an extra A3a-062 if manual retreating becomes too costly during Big Beat turns.
- A3a-062 can also hit for 100 with 3 Energy, though it needs a successful coin flip. If you’re missing A3a-006 or need a backup attacker, you can A3a-069 into A3a-062 in desperate spots—like dealing with A3-066.
- A2-150 is your trump card for closing out higher-HP threats, especially if they’ve been softened up by A3a-007.
- If you're running A3a-064, it can combo well with A3a-069. Since it’s an item, you can play both in one turn—gain Energy for A3a-006 while also targeting a benched Pokémon.
- Also remember: once you use A3a-069, the Energy recovered is gone. If you plan to use it again for another A3a-006, you’ll need to discard Energy first—often by retreating. Always check your discard pile to plan ahead.
How to Use Big Beat Every Turn
A3a-006’s Big Beat can be looped every turn by resetting its state—usually with A3a-062’s Ability. There are a few ways to do this:
- Standard Loop: Switch A3a-006 with A3a-062. Then bring out a one-retreat Pokémon like A3a-008 or A3a-007. Manually retreat that back into A3a-006 to reset and hit Big Beat again.
- Double A3a-062 Loop: If you have 2 A3a-062, use one to retreat A3a-006, then bring it back with the other—no Energy spent at all.
- Fallback Option: If you only have A3a-006 and A3a-062, manually retreat A3a-006, bring it back with A3a-062, and use A3a-069 to regain Energy. Not the most efficient, but it’s a play to remember when needed.
Card Choices
Core
Must-have cards the deck relies on to function.
- A3a-006 – Your main damage dealer and usual A3a-069 target. You can reuse Big Beat every turn by using Ultra Thrusters, then retreating the switched Pokémon.
- A3a-062 – Ideal opener that lets you choose your setup path—also tanks early hits.
- A3a-069 – The most broken card in the deck—lets you stagger threats into A3a-006, even chaining A3a-006 into A3a-006. Manual retreat can also fuel Energy discard, setting up plays where you retreat one Pokémon and let another go down.
- PROMO-005 & PROMO-007 – Core draw engine.
Adjustable
Running 2–4 copies of Kartana and Pheromosa is flexible and depends on which matchups you want to target. If you only play 2 of the 1-retreat-cost Basics, you’re less likely to pull off the standard Buzzwole–Celesteela loop and may need to rely on the dual Celesteela rotation instead—this build leans more into the dual Buzzwole + Lusamine combo. On the other hand, if you’re running all 4, you're focusing more on using them as attackers, which makes it harder to maintain the dual Buzzwole setup consistently.
- A3a-008 – Aggressive option for softening targets—run 2 for better odds against tough matchups like A2b-010, A3-122, or going second into A3a-060.
- A3a-007 – Great for sniping key bench threats—shines even more in a 2–A2-150 build.
- A2-150 – Since A3a-007 hits the bench, this can drag any of those out for a knockout.
- A3-147 – Boosts your threats’ HP, putting Buzzwole mostly out of range.
- A2-147 – The extra 10 HP rarely hits key breakpoints—Giant Cape is better for keeping Celesteela safe, especially against Solgaleo or opposing Buzzwole.
- A1-219 – Only 1 copy since most top decks hit for over 100—mainly useful in mirrors or against chip-damage builds.
Optional
Cards that can be cut without hurting core consistency.
- A2b-069 – Helps fix your hand, but mostly used to search your most broken card—A3a-069.
- A2-155 & PROMO-006 – This deck’s bad matchups—like A3-122, A2b-010, and Fire A3a-061 hybrids—are all vulnerable to A2-155 and PROMO-006 disruption.
Situational
Techs that only matter in specific matchups.
- A1-225 & A3a-064 – Solid options overall if they want to play around A3a-006’s Big Beat—A3a-064 especially combos well with A3a-069.
Against the Mirror Build
This build focuses on beating the mirror. A3a-007 can snipe opposing A3a-006, and with 2 A2-150, you’re more likely to pull it in and finish it off with your own A3a-006. Adding a second A1-219 helps counter their A3a-007–A2-150 play by keeping your key Pokémon alive. A3-151 can remove A3-147, making enemy A3a-006 easier to KO—but if you want to keep your options more open, you can keep 1 A3a-008 instead.
Swap suggestions:
- − 2 × A3a-008
- − 1 × A2b-069
- − 1 × PROMO-006
- + 1 × A3a-007
- + 1 × A1-219
- + 1 × A2-150
- + 1 × A3-151
Final Thoughts
This deck thrives on momentum and flexibility. With constant threat rotation and the power of A3a-069, you can outpace most decks while keeping pressure high. It rewards smart sequencing, careful Energy management, and knowing when to pivot—perfect for players who want full control over the flow of the game.
You can also check out our other guides for more insights! With the ranked format here, now is the perfect time to master these strategies, climb the leaderboard, and dominate matchups!