

Table of Contents [Show]
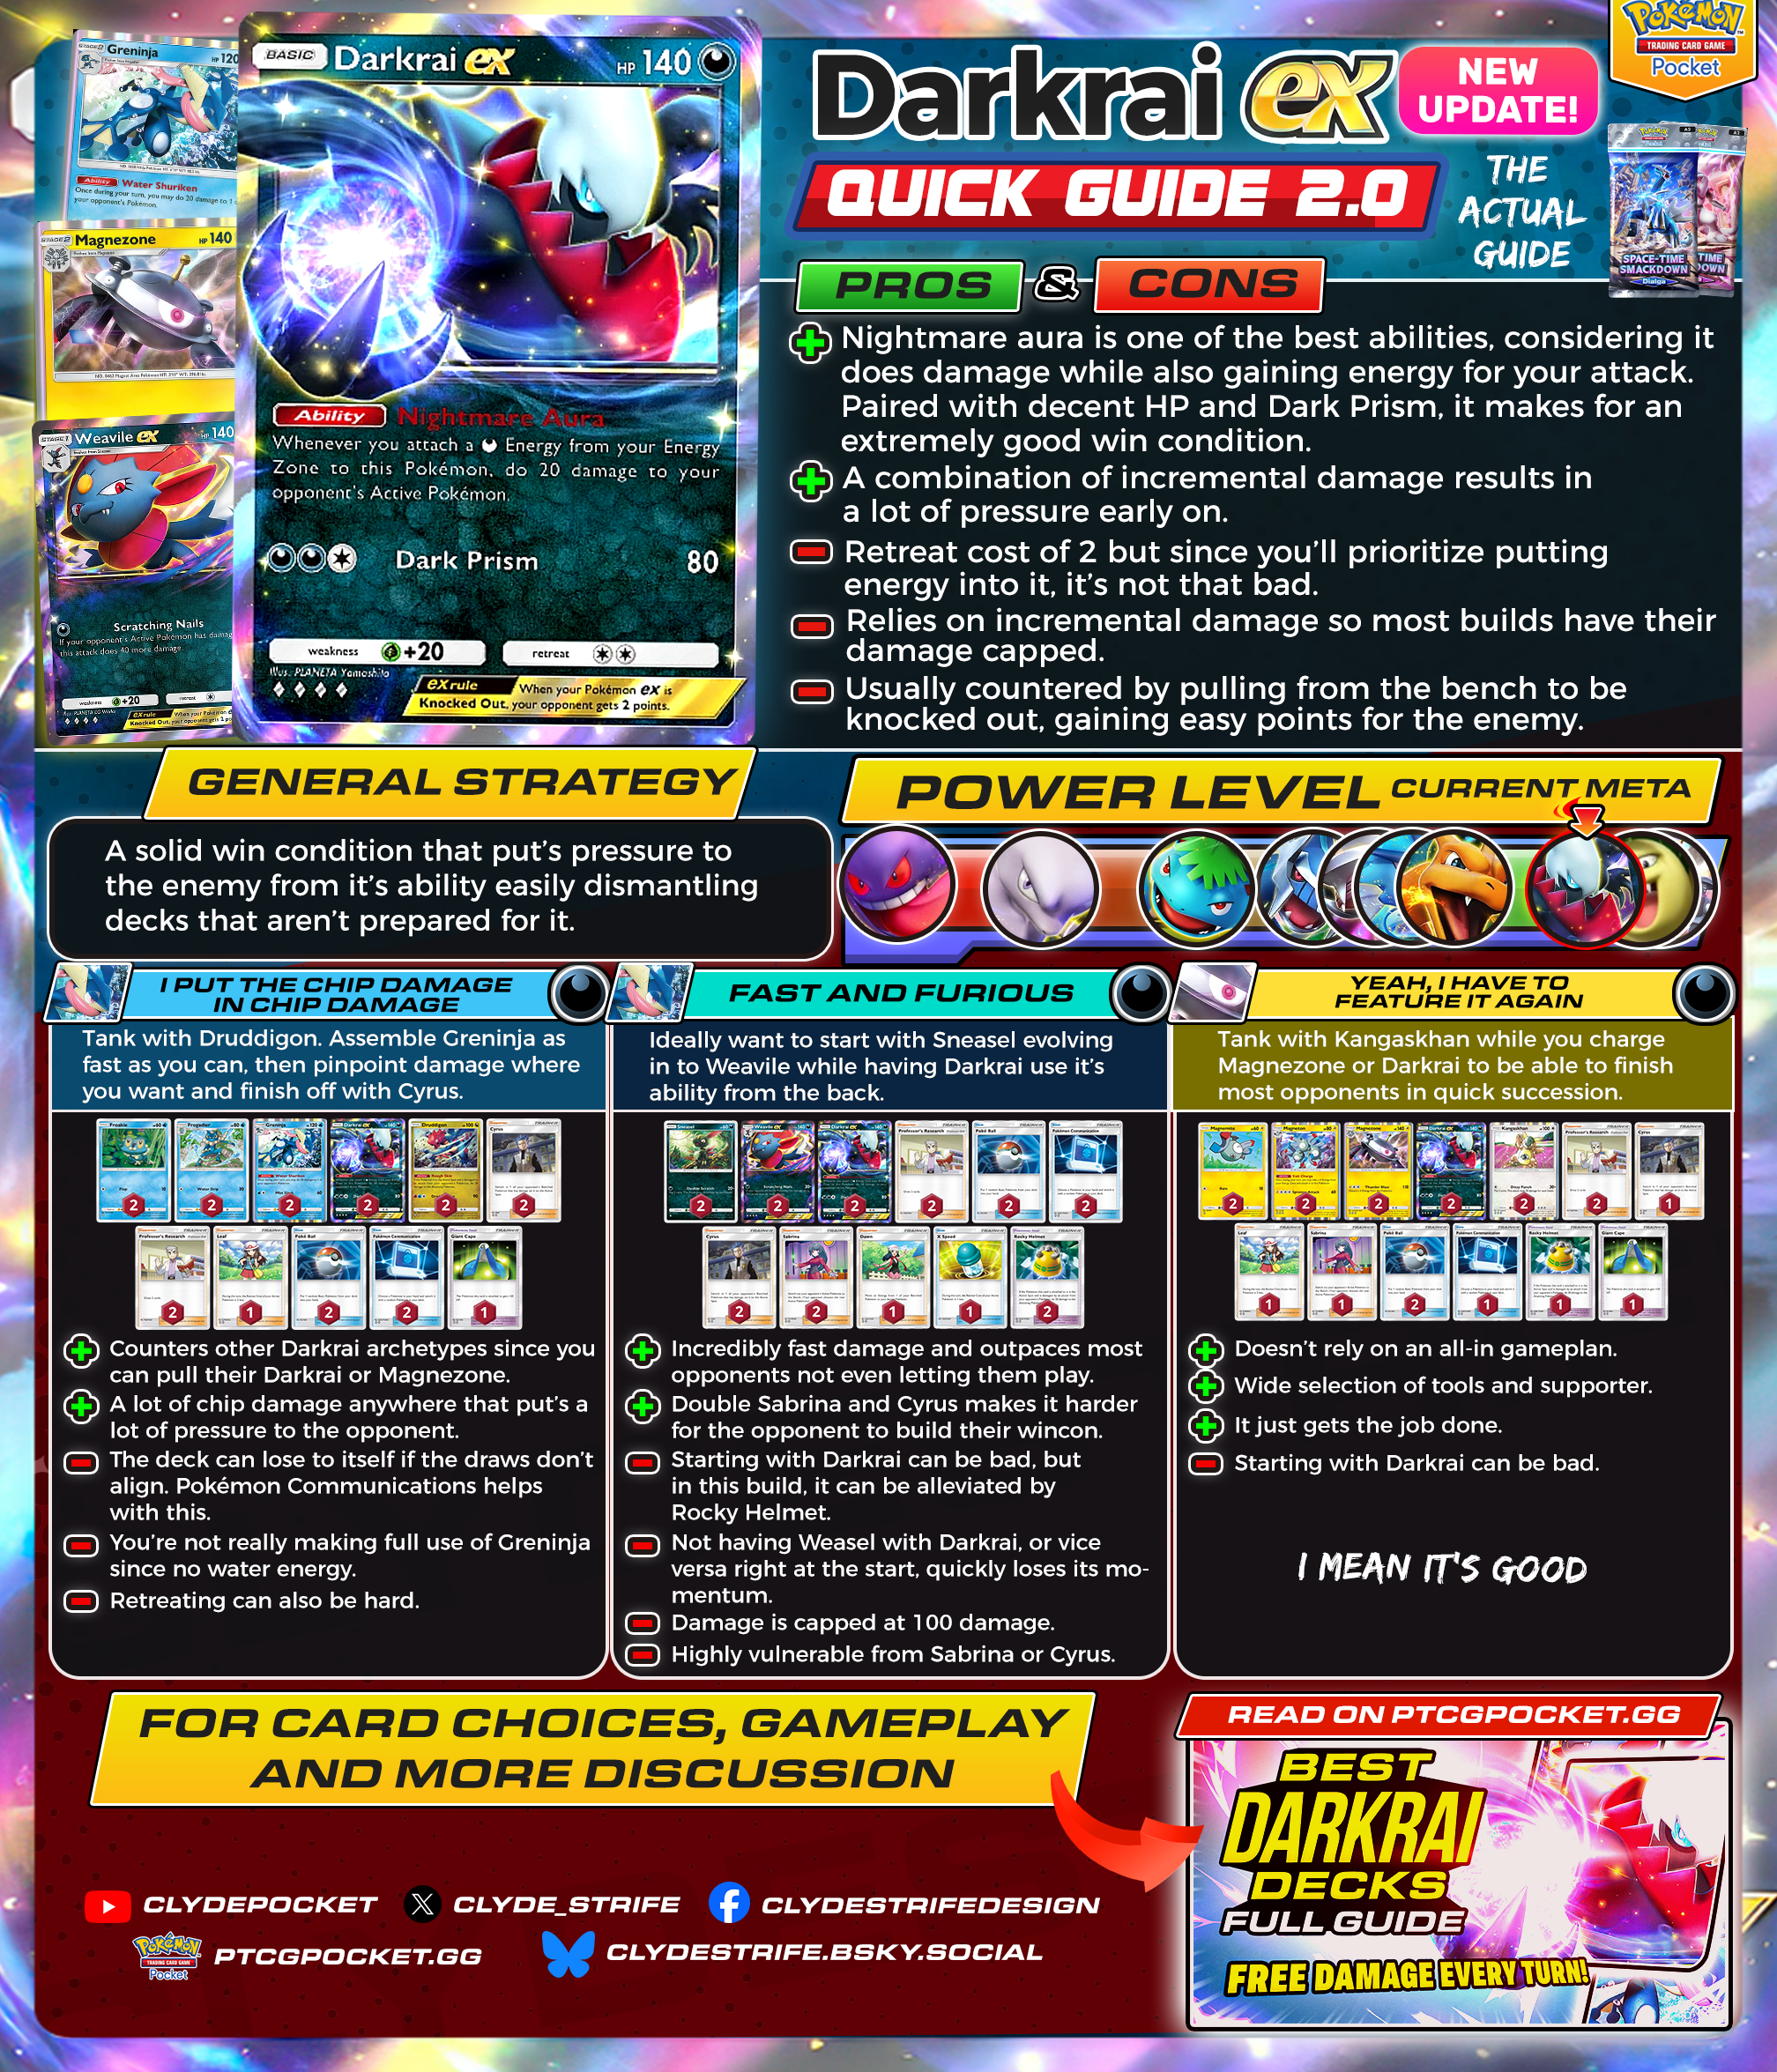
Today, we're updating the A2-110 guide now since there have been a lot of developments since I first wrote it on the first day of the Space-Time Smackdown. It has proven itself to be a real powerhouse, showing incredible results ever since. Its ability, "Nightmare Aura," has been one of the best in the game so far. Whenever a A1-089 is attached from your energy zone to A2-110, it strikes the opponent’s active Pokémon with 20 damage, dealing a lot of damage over time.
"Nightmare Aura" puts pressure on the enemy, easily dismantling any of their win conditions due to the continuous damage.
| Pros | Cons |
| + Nightmare Aura proved to be one of the best abilities considering it does damage while also gaining energy for your attack. Paired with decent HP and the 80 damage Dark Prism, it makes for an extremely potent win condition. | - Retreat cost of 2 but since you'll prioritize putting energy into it, it's not that bad. |
| + A combination of incremental damage results in a lot of pressure early on. | - Relies on incremental damage so most builds have their damage capped usually not going above 130 damage. |
| - Countered by being pulled from the bench to be knocked gaining 2 points from the enemy. |
General Strategy
The strategy is to put pressure on the enemy with "Nightmare Aura," making it hard for your opponent to build their win condition and dismantling any decks that aren't prepared for it. There are many ways to achieve this, and I'll show you the best three decks that utilize it.
The first deck is a A1-089 A2-110 deck, a product of the recent developments from A2-110. The game plan is to usually tank with A1a-056. Then, you assemble the A1-089 line while also pressuring damage from A2-110. Take note that we're just using Dark energy in this deck since you want to hit with A2-110 as much as possible so A1-089 will just use its ability. It features a poke-style gameplay with the ability to pull anything with A2-150, allowing you to pinpoint the damage and dismantle any important Pokémon your opponent tries to hide.
The A2-147 is the most flexible slot in the list and can be replaced by PROMO-001 to prevent being pulled in the mirror or a A2-148 in case you start with A2-110. However, I prefer A2-147 in the hopes of A2-110 not being one-shot since you don't really have many tank options. The deck especially counters the A2-110 A2-053 decks since you can pull their A2-110 or A2-053 with A1-089 and A2-150.
Weaknesses:
The deck takes time to set up and can lose to itself if the draws don't align, especially if you don't draw the A1-089 line early. A2-146 helps with this aspect. You're not fully utilizing the A1-089 line since there's no A1a-068. Retreating can also be challenging since we're running just one A1a-068, although I believe that's the correct number. You'd rather focus on executing the game plan as fast as possible, and retreating isn't too bad when you're putting most of your energy into A2-110 anyway.
The second deck is one of the first iterations of A2-110, which is A2-110 A2-099. It is incredibly fast since A2-099 deals 70 damage for 1 energy as long as the enemy is damaged, which is quite easy with A2-110's ability. This combo allows it to outpace a lot of decks if you draw the combo. Double A1-225 and A2-150 make it even harder for the opponent to build their win condition, allowing you to choose targets you want to rush.
A2-154 can be incredibly powerful, allowing you to put an energy on A2-110 and then transfer the energy to A2-099, enabling you to deal 90 damage for 1 energy alone. The reason I prefer using 1 A2-154 is that the ideal scenario doesn't happen most of the time, and if you have A2-099 active and A2-110, you're pretty much set on winning the game anyway, making A2-154 a win-more card. It is more important to address the deck's weaknesses, such as opening with A2-110. The first solution is including A1a-068, but because of the low Pokémon count, we may not have another one on the bench. If A2-110 is damaged, we are vulnerable to A2-150, so using A2-148 is a good solution. Even if they aggro our A2-110, more options are presented if we want to finish them off with A2-099 or threaten with A2-110's ability. We aren't including other Pokémon like A2-104 because drawing A2-099 and A2-110 is more important. Since we are running EX Pokémon, losing A2-104 means we can't afford to lose another Pokémon, so it's better to lose an EX in this case. Having another Pokémon does help with A2-146, which is something to consider.
Weaknesses:
Damage is capped at 100 damage just from A2-110, so you can't one-shot most of the big guys and have to rely on A2-150 and A1-225. The deck is highly vulnerable to A1-225 and A2-150, especially if they pull your A2-110 with no energy, preventing it from retreating.
One of the problems with this deck is starting with A2-110, which is why using A2-148 might be a good deterrent to prevent them from attacking A2-110.
Not having either A2-099 or A2-110 at the start can cause you to lose momentum.
The third deck is a familiar deck from the Magnezone guide so if you read that guide, it's the same. Every bit of the deck works together. A1-203 will be your frontliner; this can also be replaced by A1a-056, although A1-203 is better against the mirror or A1a-056 since you're still putting out pressure while tanking just for 1 energy. There aren't many places you would put energy anyway outside A2-110. A2-110 will be one of our main damage dealers, but only from its ability, Nightmare Aura, while you can also use it for the final push. Most of the time, we will be using A2-053 to attack after A1-203 has died, so it will also have its own energy already because of A1-098, so everything is on A2-110. This is the reason the deck is scary because the pressure never stops, and they can release A2-053 and A2-110 right away since they both have energy. We are running A2-150 and A1-225 for finishing anything that retreats. A1-225 is slightly better against the mirror since we have no way of targeting their bench. And we include some tools for more protection—the ratio for A2-148 or A2-147 is interchangeable, and I think having both is better for more options, but you can't go wrong with either. The best thing about this build compared to the other builds is that it doesn't rely too much on an all-in game plan since A2-110 charges on its own. The list is highly compact with just a few Pokémon, so there's a lot of consistency in finding the cards you want. There are a lot of tools and supporters, so you're equipped for every situation. The best thing about this build compared to the other builds is that it doesn't rely too much on an all-in game plan since A2-053 charges on its own.
Weaknesses:
The main problem you will encounter with the deck is that you're pretty much capped at 130 damage, so you may have to play catchup with A2-150 to finish some threats. However, with how aggressive it is, it won't be much of a problem. A2-110 is also vulnerable to bench hitters with A2-150, which is quite bad because it is an EX, so you will lose two points.
There are a lot of decks you can still put A2-110 in because of how good its ability is, like with A1a-050. So I hope you get one of the strongest cards of the Space-Time Smackdown expansion!