

Table of Contents [Show]
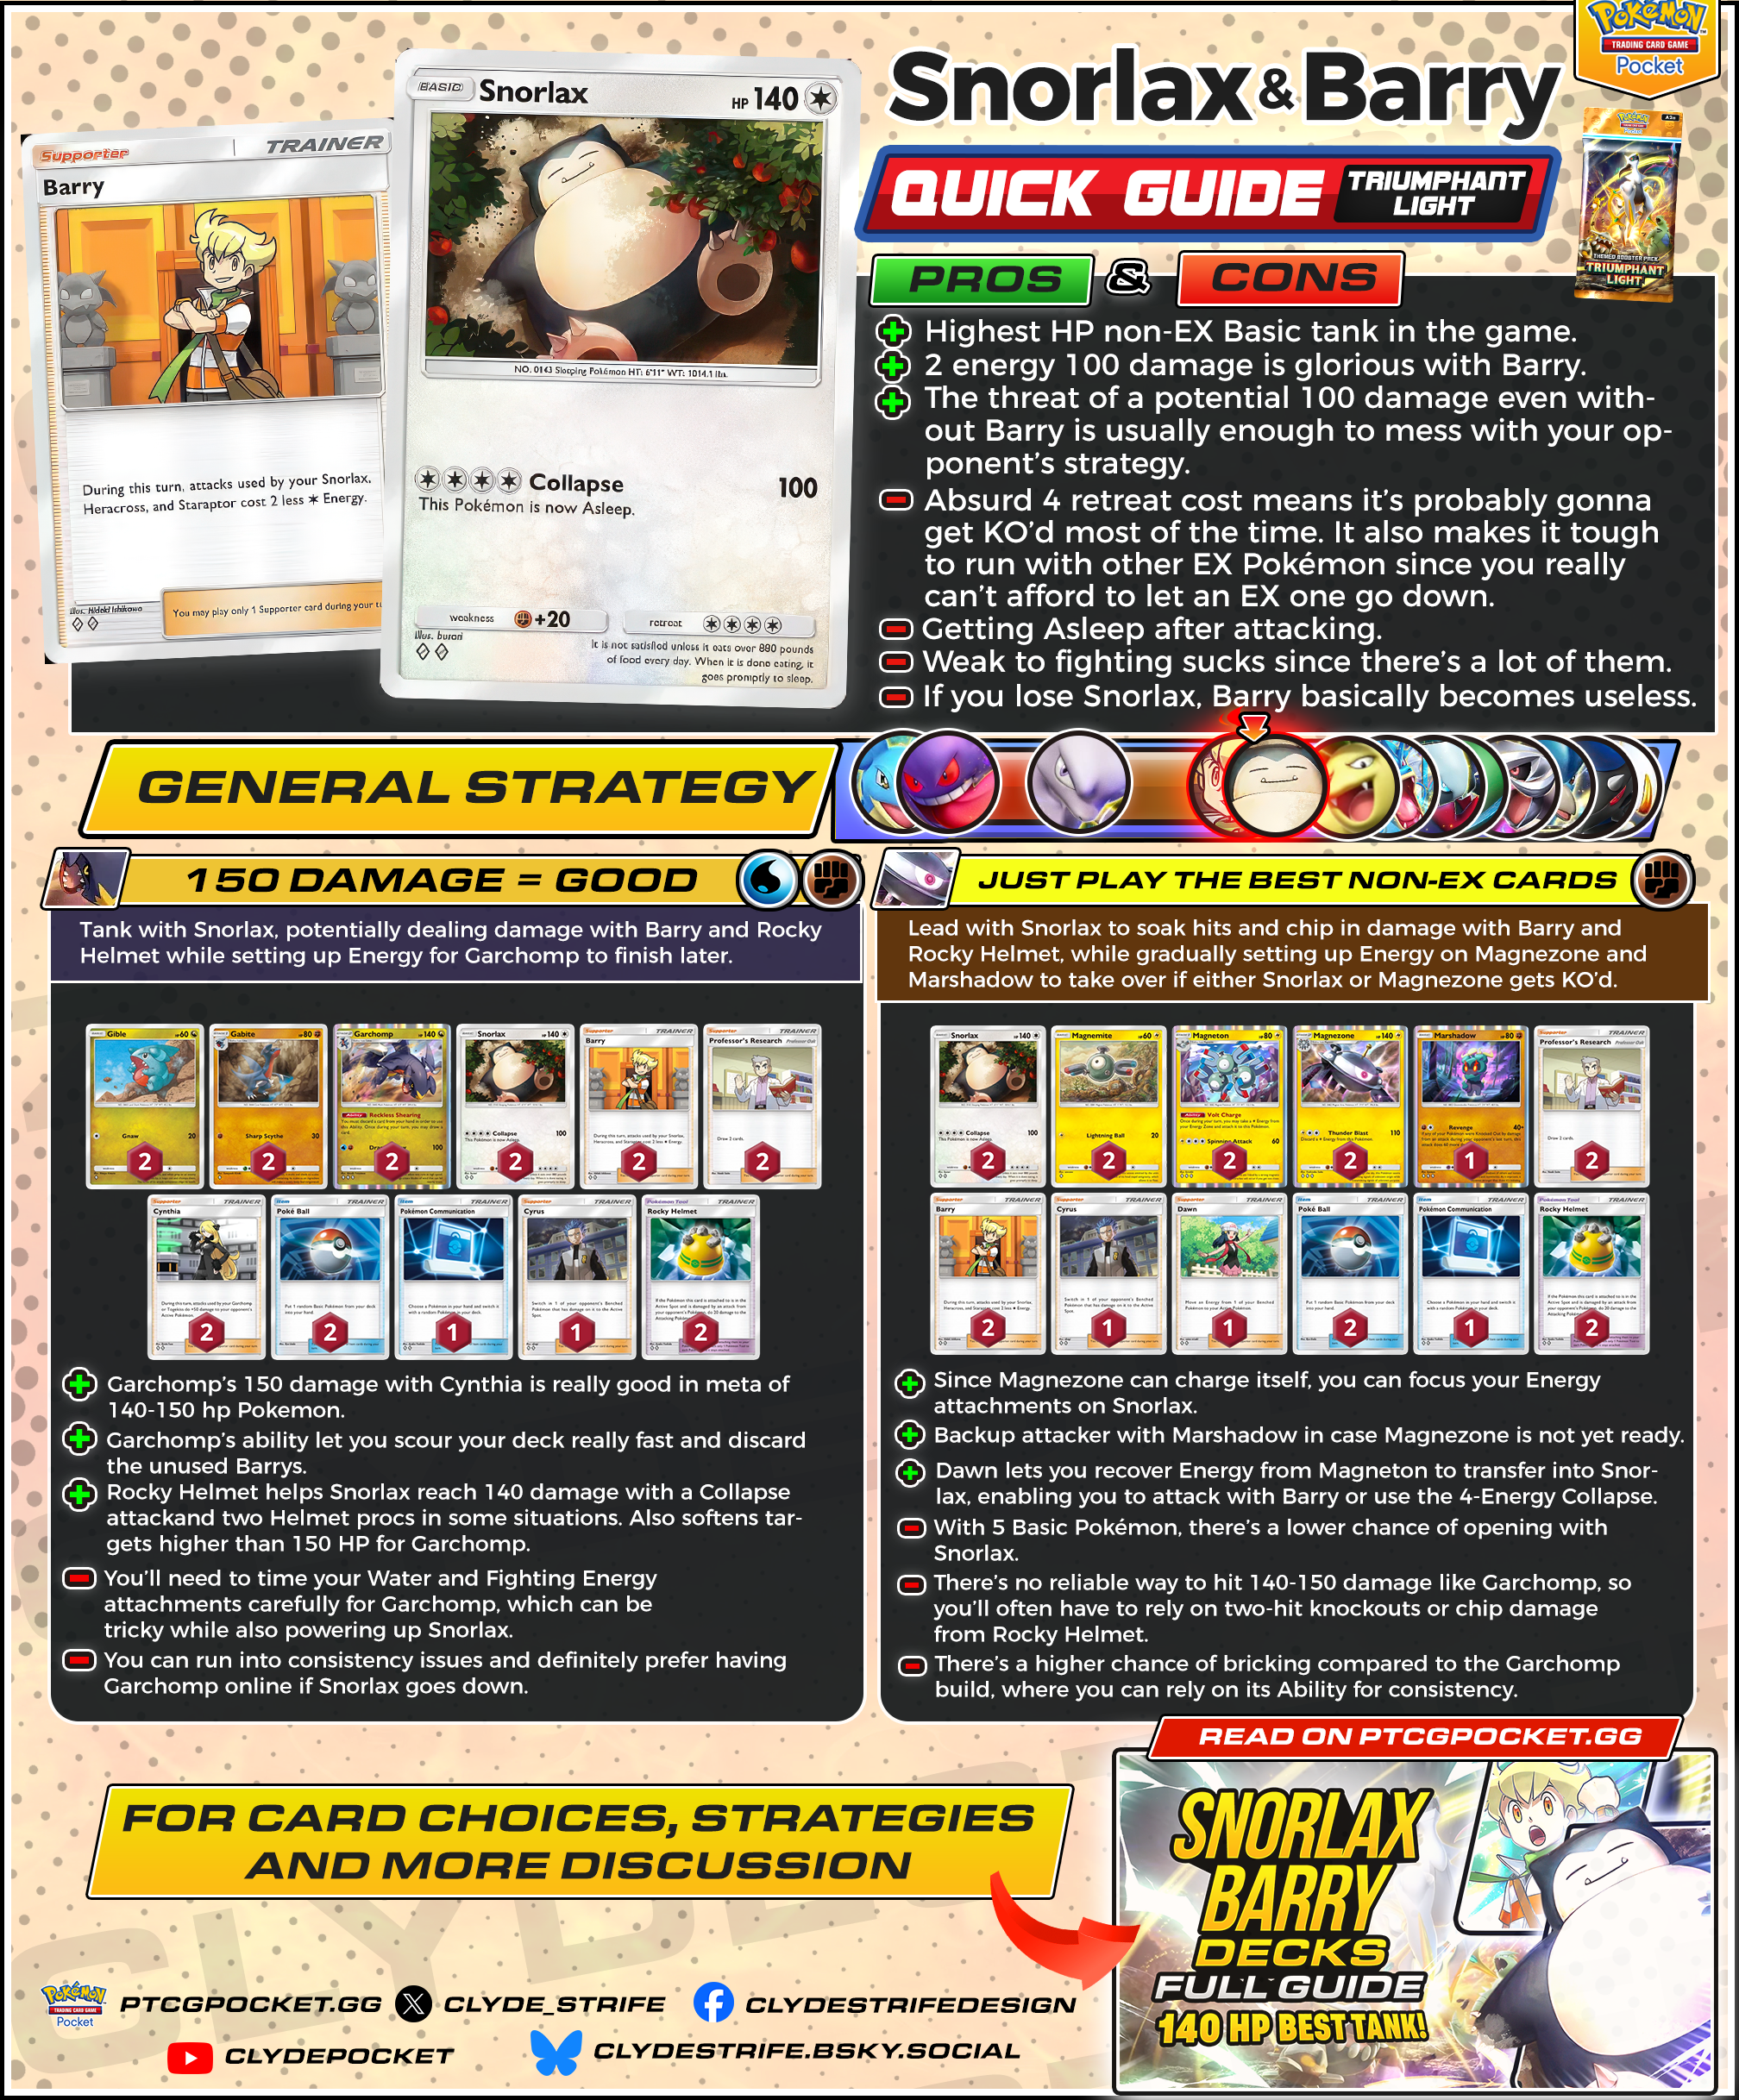
Hope you’re ready to bring out A2a-063 as one of the best non-EX tanks in the format! Today, we’re featuring A2a-063—a powerhouse that soaks up hits while dishing out 100 damage for just 2 Energy with A2a-074. With its massive 140 HP and A2-148, it can chip away at opponents while you set up your backup attackers.
I’ve scoured the best lists available and refined them for peak performance in today’s meta.
Are you ready to catch your opponents off guard with a 2-Energy, 100-damage threat?
| Pros | Cons |
| + A2a-063’s 140 HP makes it one of the bulkiest non-EX Pokémon, letting it absorb multiple hits. | - Absurd 4 Energy retreat cost means A2a-063 is likely to get KO’d once Active. It also limits your ability to run EX Pokémon, as you can’t afford to give up multiple Prize cards. |
| + With A2a-074, A2a-063 can hit for a solid 100 damage at a low cost, making it efficient in trades. | - Getting Asleep after attacking which may be bad especially if you are planning to attack again next turn. |
| + The looming threat of 100 damage forces opponents to play around A2a-063, even if A2a-074 isn’t available. | - Weak to Fighting types like A2-089 and A2-095, which are commonly played to counter A2a-071 + A2-119 decks. |
| - Since A2a-074 only affects A2a-063, losing it early can completely shut down your damage output. |
How to Play A2a-063 A2-123
A2a-063 will be your tank, and if A2a-074 comes online, it adds a bonus 100 damage while softening targets for A2-123 to clean up later.
1. Early Game – Set Up Your Board
Your first goal is to get A2a-063 Active so A2-121 can evolve safely on the Bench.
- If you start with A2-121 and already have A2a-046 and A2-123 in hand, and Energy attachments are looking good (especially Water and Fighting), it may be better not to retreat. A2-123 can deal 100 damage—or 150 with A2-152—so committing to it early can pay off.
- If you start with A2-121 but don’t have the full A2-123 line yet, retreat to A2a-063 as often as possible to buy time.
- A2-148 can set up damage for future knockouts, so plan ahead when equipping it.
2. Mid-Game – Transition to Garchomp
While A2a-063 soaks hits and weakens threats, begin building your A2-123 line in the background.
- If you’re waiting to draw into A2-123, attaching at least 2 Energy to A2a-063 can let you activate A2a-074 and deal 100 damage—often enough to KO a setup Pokémon or disrupt your opponent’s tempo.
- Observe the board carefully to decide whether A2a-063 will survive long enough to make use of additional Energy. One of the most important decisions is knowing when to commit attachments to A2a-063 or save them for A2-123.
- If the Energy in hand matches one already on A2-123, it's usually better to put it on A2a-063—even if it’s close to being KO’d—just to gain some value.
- That said, A2-123 is your main attacker, so make sure it has the Energy it needs when it steps in.
- Be cautious of bench swap effects—this is one of the biggest threats to the deck. If your attacker gets pulled forward before it's ready, you're left with just A2a-063, so make sure to keep a second Pokémon on the Bench to avoid being caught off-guard.
- A2-123’s ability also lets you discard and draw cards, even while on the Bench. This helps you dig for A2-152, A2-150, or A2a-074 if A2a-063 is still alive. For that reason, evolving into A2-123 early is usually a priority.
3. Late Game – Garchomp Takes Over
By this point, A2a-063 may be KO’d or on its last turn—A2-123 should be fully powered and ready to sweep.
- With A2-152 in hand, A2-123 consistently hits 150 damage, easily finishing off targets that A2a-063 has already weakened.
- If you’ve timed your Energy right and kept pressure up with A2a-074 and A2-148, A2-123 should have a clean path to close out the game.
Card Choices
Pokémon
- A2-123 – Your main attacker and win condition. With A2-152, it hits for 150—enough to KO most threats in the format. It accelerates Water and Fighting Energy from the deck when attacking, helping you recover tempo quickly. Its ability also lets you discard and draw 2 cards once per turn, even while Benched, making it a key consistency piece throughout the game.
- A2-121 – This is the best version of Gible for this deck since we prefer the Colorless Energy cost over Fighting, especially considering it still deals 20 damage. It’s more flexible and easier to use in the early game.
- A2a-046 – Even though we run both Water and Fighting Energy, this version of A2a-046 is preferred because it allows you to attack more reliably on turn 2 or 3. If you go first and draw into a Fighting Energy, you can attack right away after evolving. If you go second and already attached a basic Energy on turn 1, you can keep attacking with the same Energy even if you don’t draw the other type. These are things the other A2-122 can’t do, making this one the more consistent choice.
- A2a-063 – The tank of the deck. With 140 HP, Snorlax stalls and softens targets with Collapse. If A2a-074 is in play, it can deal 100 damage for just 2 Energy. Even without Barry, the threat of Collapse is enough to throw off your opponent’s tempo. Great for soaking hits while you build up A2-123.
Trainer Cards
- A2a-074 – Your cheap way to make A2a-063 attack for just 2 Energy. This lets you apply pressure while slowly building up to 4 Energy, which rarely happens but remains an option.
- A2-152 – A very important Supporter that enables A2-123 to hit 150 damage, perfectly lining up with the 140–150 HP range common in the meta. Running 2 is recommended, especially in games where A2a-063 can’t secure knockouts.
- A2-150 – A strong option for picking off retreated targets, especially EX Pokémon. Since you’re running a non-EX deck, these favorable trades matter a lot.
- A2-148 – Some players prefer A2-147, but I prefer Rocky Helmet in this deck. It gives more value to Barry’s 100-damage output by setting up 140 damage with two Helmet procs. If you’re only running A2-147, A2a-063’s damage can feel underwhelming—especially since you’re investing a Supporter just to attack, which might feel wasted when A2-123 already hits for 150.
- A2-146 – Not essential thanks to A2-123’s draw ability, but it helps you reach that stage faster. Use it early to ensure Garchomp comes online as soon as possible.
- PROMO-007 / PROMO-005 – Basic draw and search cards like Professor’s Research and Poké Ball help with early-game consistency and evolution setup.
Alternative Options
- A2-147 – An alternative to A2-148. It helps A2a-063 survive longer, but that may be irrelevant if it can’t attack. It’s more useful on A2-123 to help it survive 140–150 damage hits. Running 1 Helmet and 1 Cape is a reasonable split.
- A1-225 – A decent replacement for A2-150 or A2-146 if you want more flexibility in disruption or need a draw-based control option.
How to Play A2a-063 A2-053
A2a-063 will be your tank, ideally staying Active to absorb hits while dealing occasional damage with A2a-074 and chip damage from A2-148. Once A2a-063 goes down, A2-053 and A1a-047 step in as your main damage dealers to close out the game.
1. What Energy to Use
Fighting Energy – This deck runs only Fighting Energy. Since A1-098 provides Lightning Energy through its ability, you can safely dedicate all manual attachments to A2a-063 and A1a-047. This ensures A1a-047 is always ready when needed and simplifies Energy management overall.
2. Early Game Setup
Your first goal is to get A2a-063 Active to soak hits and stall, giving you time to evolve into A2-053 and start setting up Energy on A1a-047.
- If you open with A2-051, focus on evolving it into A2-053 as early as possible so you can start using its ability to gain Energy consistently. Don’t waste attachments on A2-051—save them for A2a-063 or A1a-047.
- If you open with A1a-047, consider retreating into A2a-063 immediately, unless the 40 damage is impactful enough to warrant staying Active.
- A2-148 should be equipped early if you expect A2a-063 to take hits. It often helps reach knockout ranges for A1a-047 or A2-053.
- Watch out for bench swap effects. Since A2a-063 often protects your evolving Bench, keep another Basic in play to shield your setup Pokémon like A1-098 or A1a-047.
3. Late Game
A2-053 charges itself via A1-098, so you can commit manual attachments to A2a-063 early. This allows you to use A2a-074 to deal 100 damage and pressure with Collapse right away. A2-154 can then transfer Energy from A1-098 back into A2a-063 to attack again.
- If A2a-063 is about to be KO’d, start attaching to A1a-047. Just one Fighting Energy gets it ready to attack next turn.
- After A2a-063 goes down, shift into A2-053 or A1a-047, depending on the matchup. Use whichever fits best based on speed, pressure, or survivability.
Card Choices
Pokémon
- A2-051 – Just a setup Basic you’ll want to evolve into A1-098 as soon as possible. Don’t waste Energy attachments here—focus on getting it off the board and into your engine.
- A1-098 – The key reason A2-053 is viable as a main attacker. A1-098 provides Energy on its own using its ability, requiring no manual Energy investment. This frees you up to focus attachments on A2a-063 or A1a-047 instead.
- A2-053 – Your main attacker. Thanks to A1-098, it usually has the Energy it needs without much setup. Its solid HP gives it durability in trades, making it a reliable and consistent damage source throughout the game.
- A2a-063 – Your early-game tank. With 140 HP, it stalls and pressures with Collapse. If A2a-074 is active, it becomes a serious threat, dealing 100 damage for just 2 Energy. A2-148 adds chip damage while Snorlax absorbs hits and buys time to set up A2-053 or A1a-047.
- A1a-047 – A backup attacker that deals 100 damage for just 2 Energy. Ideal for finishing off weakened targets or stepping in after A2a-063 or A2-053 is removed. Great for cleaning up in the late game.
Trainer Cards
- A2a-074 – Lets A2a-063 hit for 100 damage with just 2 Energy. Crucial for applying early pressure and setting up future knockouts.
- A2-150 – A strong control tool for picking off retreated EX Pokémon or setting up favorable trades. Especially useful in a non-EX build like this one.
- A2-154 – Not essential, but very useful. Allows you to transfer Energy from A1-098 into A2a-063, enabling Collapse across consecutive turns—especially effective after a A2a-074 activation.
- A2-148 – Provides chip damage while A2a-063 is Active. Two Helmet procs plus Collapse total 140 damage, letting you hit key knockout thresholds against common threats.
- A2-146 – Helps you search out A2-053 early. Especially helpful in slower hands when you're trying to hit evolution pieces fast. Optional, but improves consistency.
- PROMO-007 / PROMO-005 – Reliable draw and search tools to improve overall consistency. Keeps your hand moving and helps evolve your board efficiently.
Alternative Options
- A2-147 – A viable alternative to A2-148. While it helps A2a-063 survive longer, it can be more impactful in a lower-damage deck like this. Rocky Helmet is stronger early, but Giant Cape provides late-game durability.
- A1-225 – A solid alternative to A2-154 if you prefer hand disruption and control over Energy recycling.
Final Thoughts
Thanks for reading! Whether you prefer A2-123’s burst damage and draw support or A2-053’s self-charging consistency, both decks make excellent use of A2a-063 as a tank and setup piece. Each build offers a strong non-EX option that can hold its own in the current meta. Try them both and see which style fits you best!
You can also check out our other guides for more insights! With the ranked format coming later this month, now is the perfect time to master these strategies, climb the leaderboard, and dominate matchups!