
Table of Contents [Show]
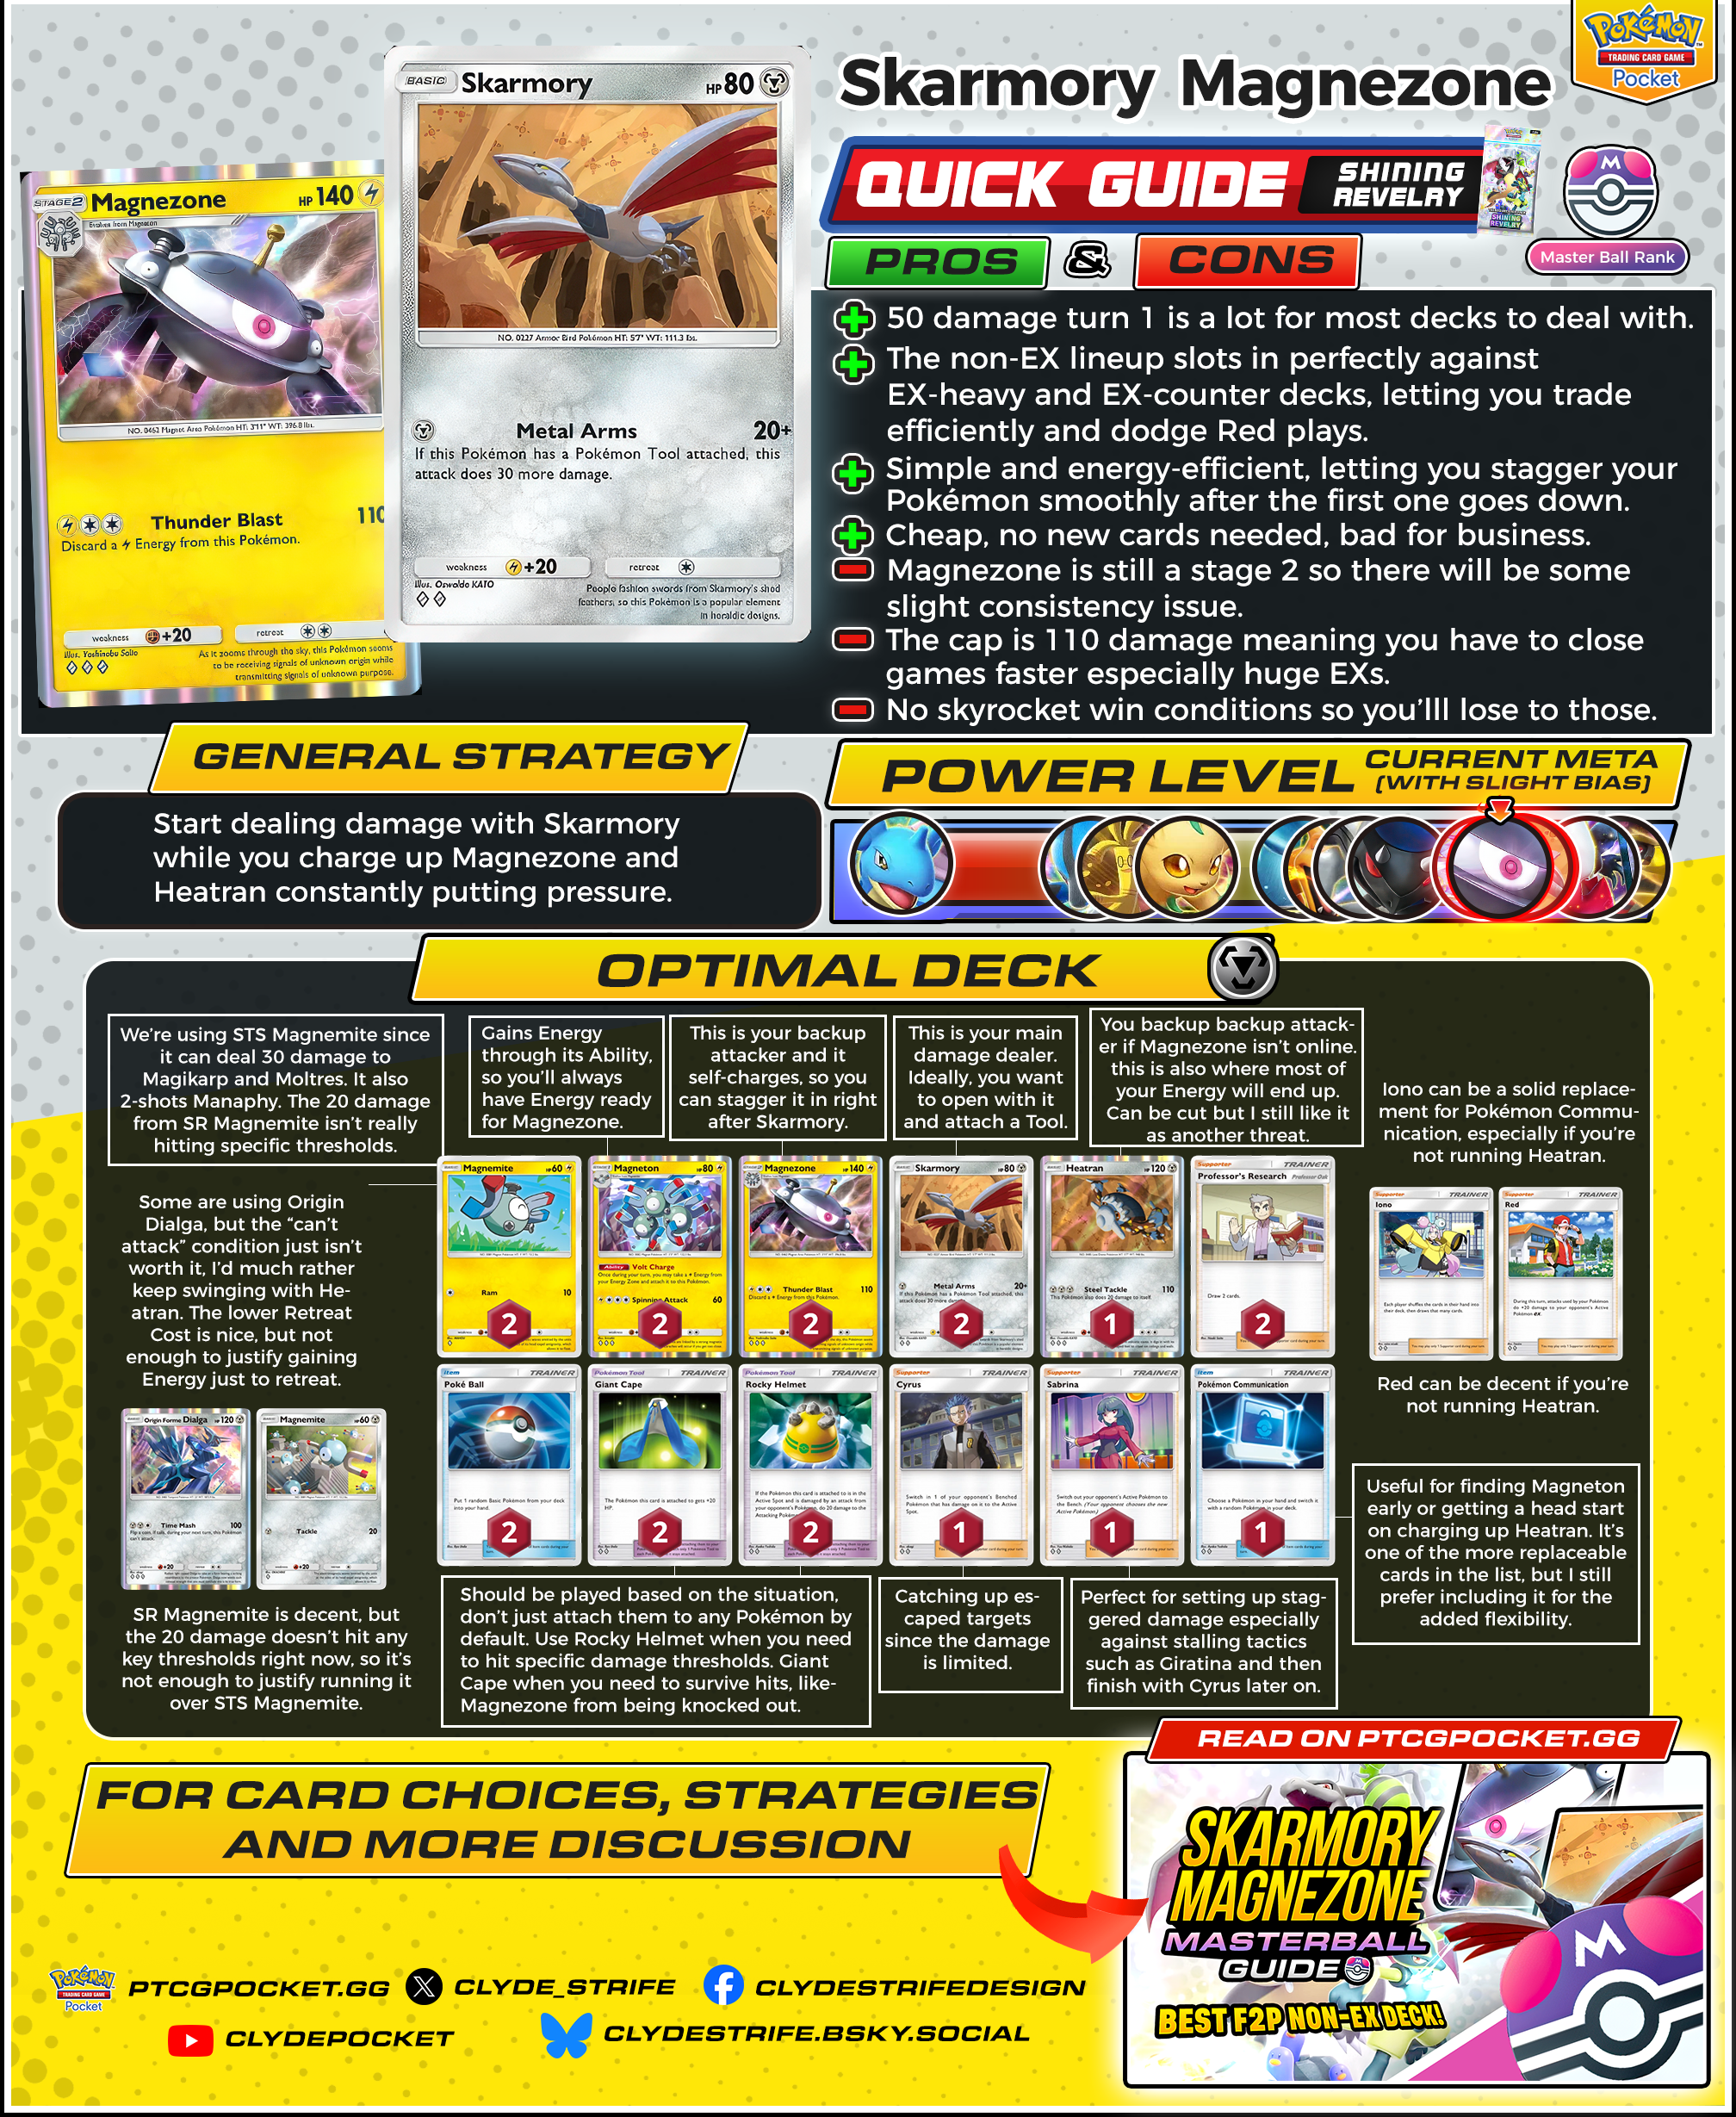
This isn’t some new deck. A2-111 and A2-053 have been around for a while. But we’re featuring it now because, honestly, it’s performing incredibly well in the current meta. I used it from Ultraball 3 all the way to Master Ball and steamrolled most of the climb. I didn’t get to track my exact win rate, but I rarely lost — and it definitely wasn’t a fluke.
I also saw more players picking it up along the way, which just shows it’s quietly putting up solid results. It’s fast, consistent, and trades well into nearly every popular deck right now.
In this guide, we’ll go over how the deck works, what makes it strong, and how to play it into different matchups.
Let's check this one heck of a deck!
Strengths & Weaknesses
| Pros | Cons |
| + A2-111 hits 50 damage as early as turn 1, which is more than most decks can comfortably handle. It puts your opponent on the back foot immediately and forces early trades in your favor. | - There’s a bit of consistency risk when setting up A2-053, especially without search support or if your early turns get disrupted. |
| + The full non-EX lineup trades well into EX-focused decks and avoids common EX-specific counters like A2b-071. This gives you better matchups across the board with minimal teching. | - The 110 damage ceiling means you have to play efficiently and finish games quickly. Against bulky EX attackers, you may need to rely on smart trades or force them to mismanage their board. |
| + The deck is straightforward to pilot. Its attackers are energy-efficient, allowing you to stagger threats without overcommitting resources. Once set up, it flows well from one attacker to the next. | - There's no explosive catch-up potential here. If you fall behind in tempo or lose your setup pieces too early, it can be hard to recover. |
| + Cheap being 3 diamond and below. This is one of the few decks that performs at a high level while remaining fully F2P. |
How to Play Skarmory Magnezone
Your goal is simple — start fast with A2-111 and keep the pressure going with A2-053 and A2-120. You don’t need fancy combos or risky plays. Just play clean tempo, keep attacking, and rotate threats efficiently. The early pressure will overwhelm most opponents, often forcing them into bad trades or awkward sequencing that you can easily capitalize on.
Turn 1
- A2-111 is your ideal starter. With a Tool attached, it deals 50 damage for just one Energy — most decks can’t respond to that on their first turn. You can pick off low-HP Basics, slow down setup-focused lines, or soften up EXs early so they’re easier to KO later.
- While A2-111 is active, you should be building your Bench. Prioritize getting A2-051 into play so it can evolve into A1-098 later. If you suspect the opponent is running A1-225, having a second Basic like A2-120 ready on Bench can help avoid losing key setup pieces to a forced switch.
- If you started with A2-051, retreating into A2-111 is usually the right move. But if your hand already has A1-098 and A2-053, and the opponent is off to a slow start, evolving straight into Magnezone might be worth it — especially if you can set up an immediate response.
- If you start with A2-120, your options are limited. Charging it up is your best move if you expect to swing into something immediately. Otherwise, you may just have to let it go — the high Retreat Cost makes retreating inefficient.
Midgame
- If your opponent’s pressure is light, you can keep attacking with A2-111 and stagger A2-053 as a follow-up. If you need to push damage, pivot into A2-053 or A2-120 early to stay ahead in the trade.
- Keeping momentum with A2-111 is critical. If you stall out during this phase, most decks will catch up quickly and overwhelm you. The idea is to keep pressing damage while setting up your second and third attackers.
- Tool management becomes very important here. Don’t attach A2-147 or A2-148 carelessly:
- A2-148 is best used to hit specific thresholds, especially against self-damaging attackers like A2b-035. It can also punish trades that would otherwise be neutral.
- A2-147 should go on attackers like A2-053 when you need them to survive critical hits — this is especially relevant in matchups where 110 damage leaves you just barely out of range of a return KO.
- Your Energy needs to be used efficiently. A1-098 should be charging itself with its Ability. If you don’t have A1-098 or A2-120 down yet, your next priority is to find them with A2-146 or A2b-069. You do not want to be stuck with just A2-111 on board and nothing ready behind it.
- Ideally, A2-053 should be close to fully charged by now. Even better if A2-120 is also charging or ready to go. The strength of this deck lies in your ability to constantly rotate threats without falling behind on Energy.
Endgame
- At this point, A2-053 or A2-120 should be your finishers. Both deal 110 and can self-fuel, letting you continue swinging without needing to recover from a KO.
- This is also where A1-225 and A2-150 come in.
- A1-225 is especially important against stall decks or tank-focused builds like A2b-035. You can leave their main tank in KO range, then pull up a Benched threat to KO instead — forcing awkward retreat or heal decisions.
- A2-150 should be saved for when the opponent is clearly trying to retreat damaged Pokémon.
- Your endgame plays will depend entirely on how cleanly you’ve sequenced the first two phases. If you’ve kept pressure with A2-111, managed Tools well, and prepped your Energy targets properly, you’ll often reach this point with full control of the game.
Matchup: Giratina EX
A2b-035 is probably one of your hardest matchups, especially if they’re packing a lot of healing. It lets them get away from breakpoints that you can’t reach with A2-150 if they retreat. You won’t always be able to punish their tanks directly once they start rotating between attackers and healing.
That said, you can still be highly favored here — especially if you start with A2-111 and apply early pressure. Hitting their tank early forces them into a defensive line, usually charging up from the Bench instead. This slows them down and gives you room to set up your board.
This is where A1-225 becomes clutch. You can leave their tank in KO range, then use A1-225 to bring up one of their Benched Pokémon and hit it with something huge like A2-053. If it’s holding A2-147, it likely won’t be KO’d in return. Now their board is split — one damaged tank in the Active or Bench, and another big hit taken from Magnezone. You can then clean up with A2-150 later. It forces them to either retreat again or attack into your tanky Magnezone, but you’ll have such a large HP advantage that you can just trade freely.
If you can’t attack with A2-053 right away, having a throwaway attacker like A2-111 with A2-148 still lets you push damage. Since A2b-035 damages itself with its own attack, and Rocky Helmet stacks on top of that, you’re setting up perfect KO thresholds. That gives you a free follow-up knockout with A2-053 or A2-120, and you don’t even need A2-150 to close it.
A2b-071 is worth considering in this matchup if you’re not running A2-120. Red gives you more firepower and can help deal with retreating Giratina lines before they heal out of range. It’s a good swap if you decide to cut Heatran.
Card Choices
Pokémon
- A2-111 – Ideal starter. Hits 50 on turn 1 with a Tool, punishing slow setups and forcing early trades.
- A2-051 – We’re using STS Magnemite since it can deal 30 damage to Magikarp and Moltres. It also 2-shots Manaphy. The 20 damage from A2a-053 isn’t really hitting specific thresholds.
- A1-098 – Gains Energy through its Ability, so you’ll always have Energy ready for Magnezone.
- A2-053 – This is your backup attacker and it self-charges, so you can stagger it in right after Skarmory.
- A2-120 – Your backup backup attacker if Magnezone isn’t online. This is also where most of your Energy will end up. Can be cut, but I still like it as another threat.
Trainer Cards
- A2-147 & A2-148 – Should be played based on the situation. Don’t just attach them by default. Use Rocky Helmet when you need to hit specific damage thresholds. Giant Cape when you need to survive hits, like protecting Magnezone from being knocked out.
- A2-150 – Catching up escaped targets since your damage is limited.
- A1-225 – Perfect for setting up staggered damage, especially against stalling tactics like A2b-035, then finishing with Cyrus later on.
- A2-146 – Useful for finding Magneton early or getting a head start on charging up Heatran. It’s one of the more replaceable cards in the list, but I still prefer including it for the added flexibility.
- PROMO-007 & PROMO-005 – Mandatory card draw to make the deck more consistent.
Alternative Options
- A2b-069 – Can be a solid replacement for A2-146, especially if you’re not running Heatran since you’ll have one less Pokémon to search.
- A2b-071 – Can be decent if you’re not running Heatran, giving you more firepower — especially useful in the A2b-035 matchup.
- A2a-060 – Some are using Origin Dialga, but the “can’t attack” condition just isn’t worth it. I’d much rather keep swinging with Heatran. The lower Retreat Cost is nice, but not enough to justify gaining Energy just to retreat.
- A2a-053 – Decent, but the 20 damage doesn’t hit any key thresholds right now, so it’s not enough to justify running over A2-051.
Final Thoughts
A2-111 A2-053 might not look flashy, but it’s one of the most reliable and efficient decks in the current format. It plays fast and trades well. If you’re looking for a F2P-friendly deck that can carry you through Ranked without skipping a beat, this is it. With the right sequencing and a solid understanding of your matchups, you’ll consistently out-tempo decks that cost way more to build.
You can also check out our other guides for more insights! With the ranked format here, now is the perfect time to master these strategies, climb the leaderboard, and dominate matchups!