
Table of Contents [Show]
We’re finally featuring one of the best contenders in the Shining Revelry meta! While it might not sit at the very top, A2b-007 is one of the few decks that can consistently beat A2b-035—if you draw well. There are actually several A2b-007 variations out there, and I’ll do my best to cover the most notable ones while giving as much info as possible. I left a few out since they either play too similarly or just aren’t as optimal as the ones featured here. Let’s get into it!
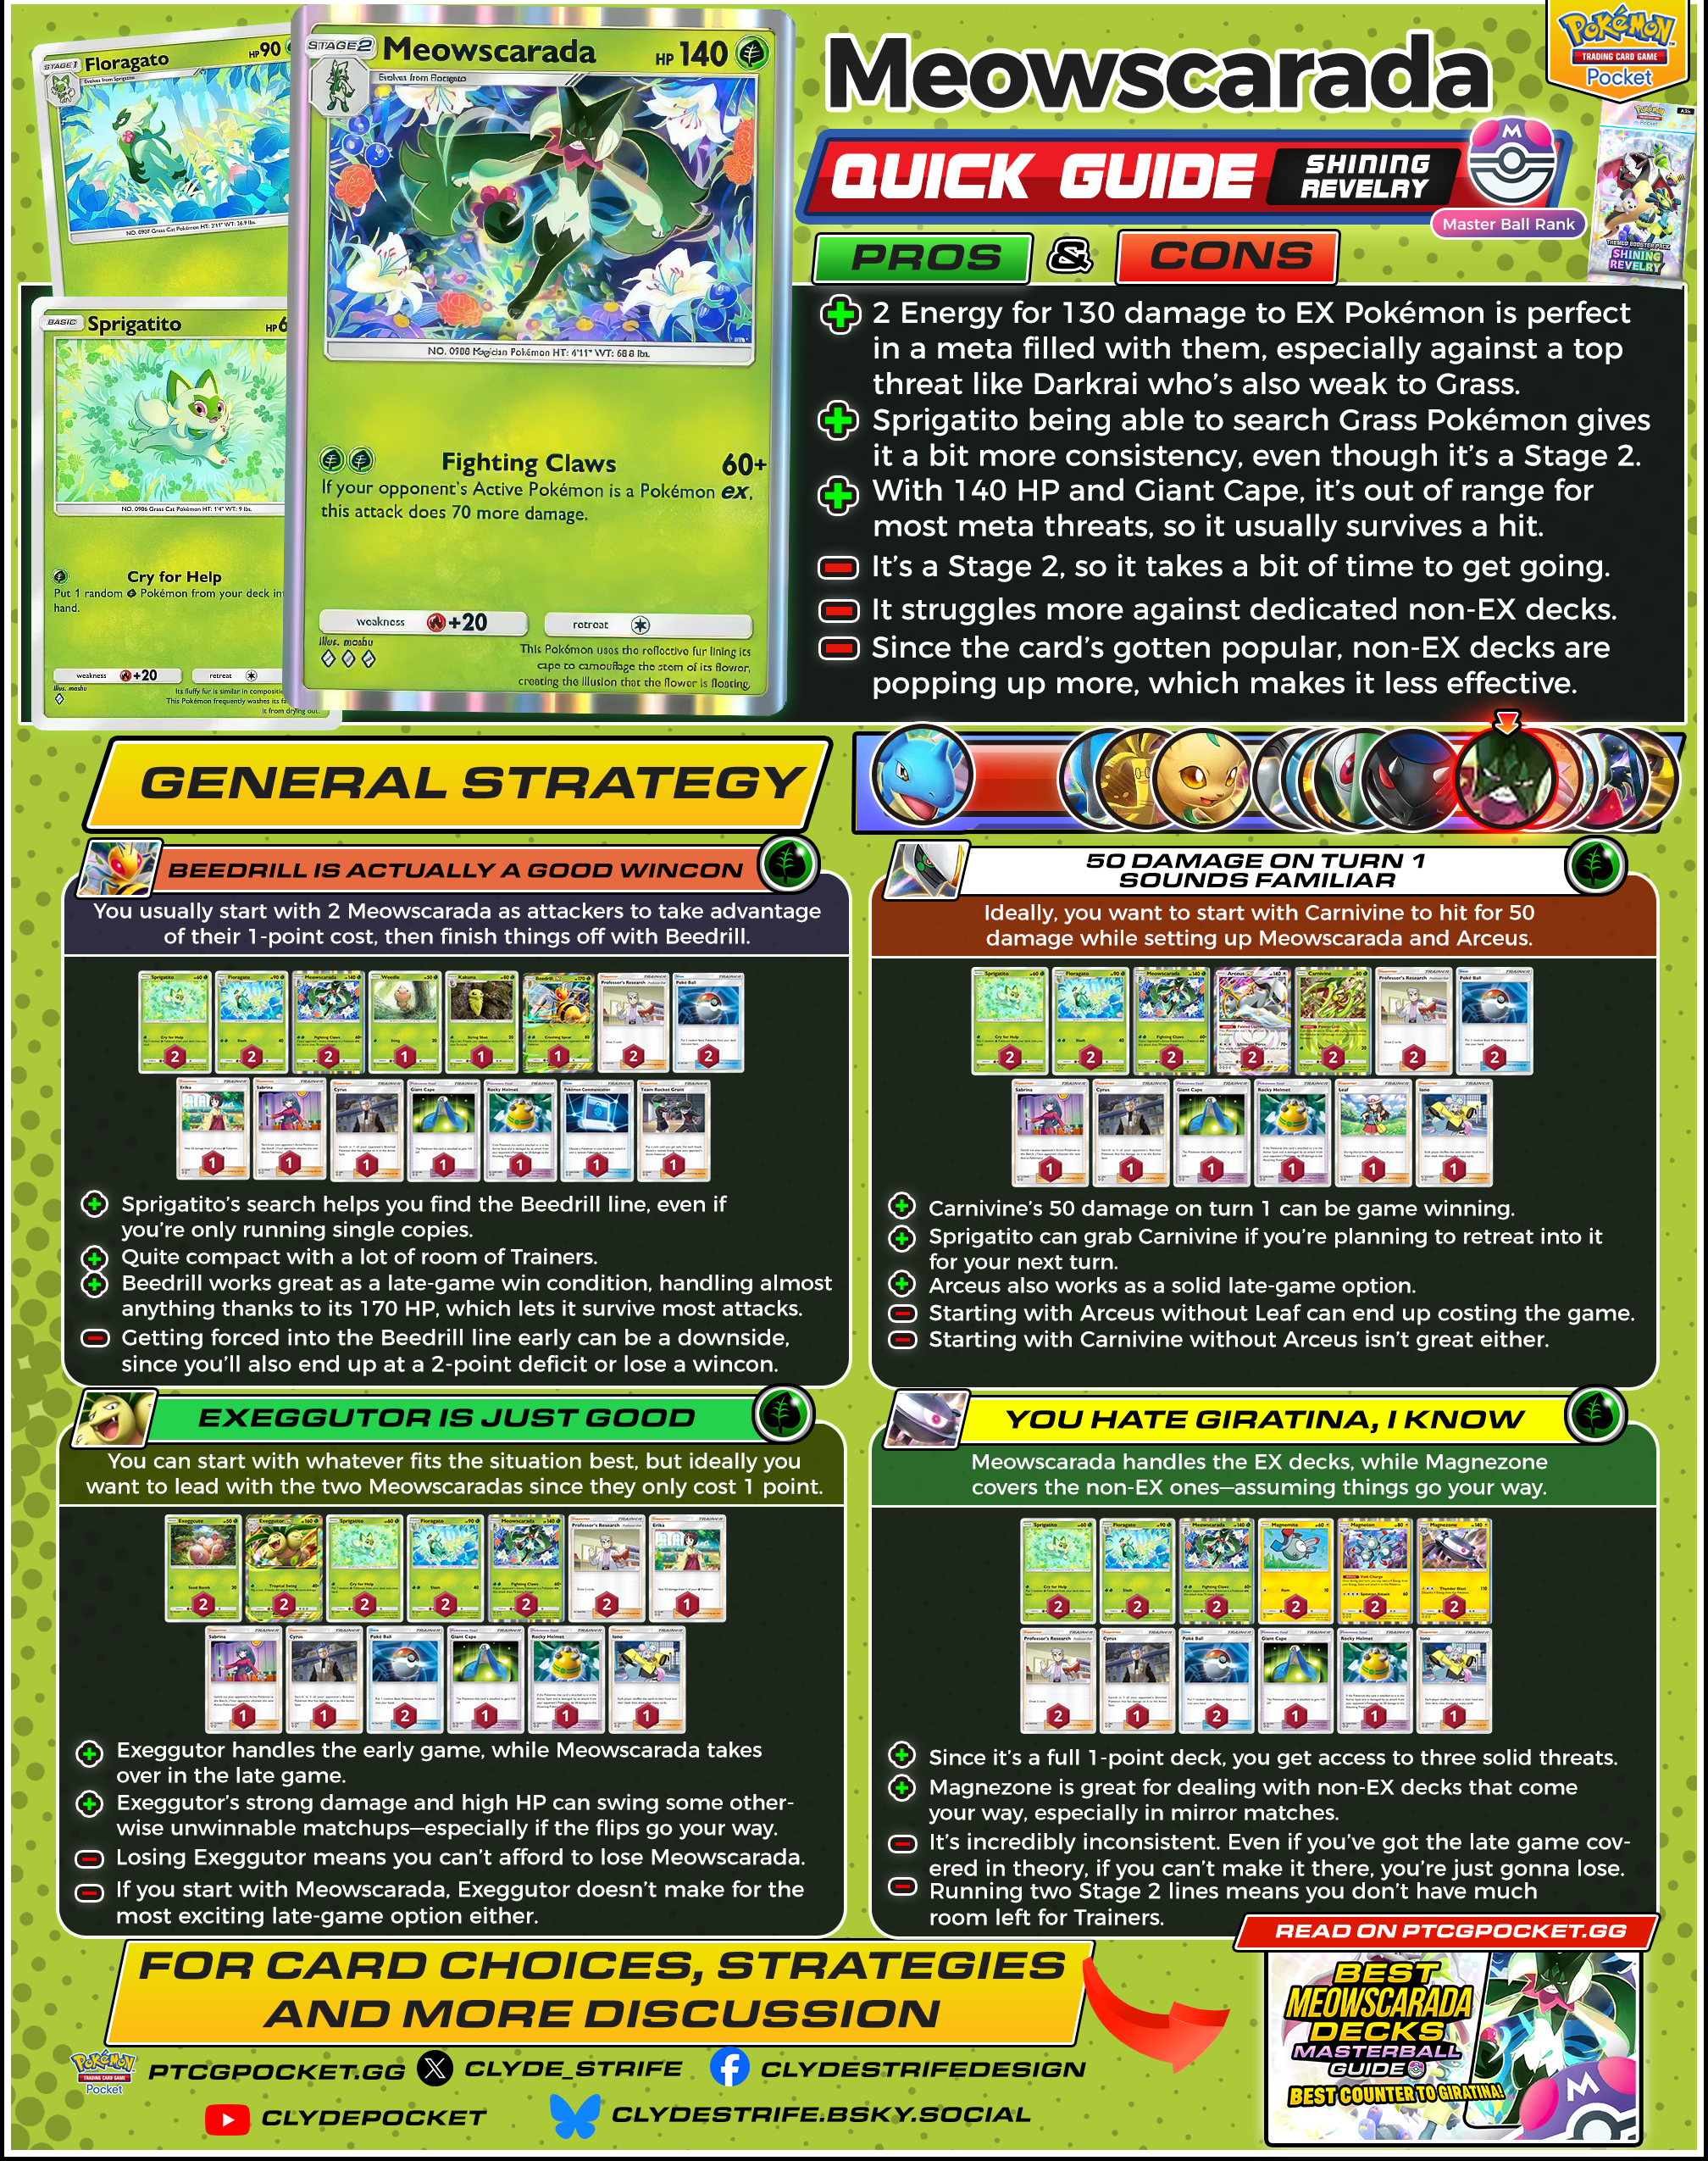
| Pros | Cons |
| + Strong against EX-focused decks. Dealing 130 damage for just 2 Energy makes Meowscarada a real threat in an EX-heavy meta, especially when targeting popular cards like Darkrai that are weak to Grass. | - Slow setup. Since A2b-007 is a Stage 2, it naturally takes more time and resources to get going compared to Basic decks. |
| + Surprisingly consistent for a Stage 2. A2b-005 can search for Grass Pokémon, giving the deck smoother setup compared to most Stage 2 lines. It also lets you soak a hit with your Active A2b-005 while safely evolving your benched one. | - Struggles against non-EX decks. While it excels against EX threats, it doesn’t do as well against decks that focus on non-EX attackers. |
| + Tough to take down. With 140 HP and A2-147, A2b-007 can survive hits from a lot of common threats, keeping it on the board longer than expected. | - As A2b-007 gains popularity, more players are either running it or building non-EX counters, making it less dominant overall. |
Optimal Decks
A2b-007 decks are built around smart point efficiency. As a non-EX, it only costs 1 point, but it deals big damage to 2-point EX threats. In most versions, the ideal start is with two A2b-007, applying early pressure without giving up late-game power.
A2b-005 is your main consistency tool. Its ability to search for Grass Pokémon makes the deck smoother than most Stage 2 builds. It also acts as a buffer, taking a hit up front while your bench evolves safely.
Beedrill Meowscarada
The A2b-003 version is one of the most successful and polished ways to play A2b-007—and easily my favorite. The smartest innovation here is only running a single A2b-003 line, which works surprisingly well. Thanks to A2b-005’s search ability, it’s easy to grab the pieces when you need them, and you usually only need to bring out A2b-003 once, as a late-game finisher.
The deck is very compact, focused purely on the A2b-007 lines and one A2b-003 line. That leaves you with a lot of space for Trainers, which helps smooth out your setup and gives you the flexibility to adapt to different matchups.
Your typical plan is to use up both A2b-007 before bringing out A2b-003. But sometimes, you’ll lose a A2b-005 early while setting up. In those cases, going into the late game with one A2b-007 and one A2b-003 still gives you enough firepower to deal with nearly any threat—except for A2b-010. Just be careful: evolving into A2b-003 too early can backfire, leaving you with a dead 2-point liability and no fallback if A2b-007 goes down.
Card Choices
The Trainer lineup here is flexible, though a few choices might raise eyebrows.
One major omission is A2b-071. It’s a strong card, especially when paired with A2b-007 to knock out EX threats. But I left it out because of the current ladder meta. With the rise of non-EX decks like A2-111 A2-053 and tons of A2b-007 mirrors, A2b-071 ends up being a dead draw more often than not. In a tournament where you’re mostly facing A2b-035, it’s absolutely worth including. But for ladder play—especially in Ultra Ball range—it’s just not consistent enough.
I also think A2b-007 is already solid against EX decks without A2b-071, and most opponents now use A2-147 on their key threats to stay out of A2b-071 range—common on targets like A2b-035. You’ll end up attacking twice anyway, so in my view, it’s better to focus on your non-EX matchups.
Instead, I run A2-148, which helps hit key damage thresholds and stays useful even against non-EX decks. In this version, tool placement really matters. Since A2-148 is your main way to catch up on damage without A2b-071, you can’t afford to just throw tools out. A2-148 is also 1 card deeper if you're avoiding Mars since that is one of the counters to this deck too unlike when you're just running Red. Even A2-147 should be played strategically—you want A2b-007 to survive a hit and hit back hard.
I usually include one A1-219, though it’s not essential. Most matchups either involve chip damage or big one-shots from threats like A2b-035 or A2-110, making A2-147 more important for survival. Still, one A1-219 gives you a safety net in grindy games.
A2-150 becomes even more crucial here since A2b-003 only hits for 80. If something retreats out of range, A2-150 is your way to bring it back and clean it up. A1-225 isn’t as important, but it can swing specific situations, so I like having one.
A2-146 is a useful tech too. When you’ve drawn all your Basics early, your PROMO-005 starts to whiff. Having a way to return a Pokémon and swap for an evolution can smooth things out a lot.
Lastly, A2b-072 is the most cuttable card in the list, but I like including one. It pairs nicely with A2b-003 in the late game, helping you remove a key threat and potentially flip the match in your favor.
Carnivine Arceus Meowscarada
The A2a-009–A2a-071 package is another strong route for building around A2b-007, giving the deck better early-game control. A2a-009 deals 50 damage right away, helping you stall and apply pressure while setting up A2b-007 and possibly A2a-071. It’s a solid way to slow the game down and beat almost anything—when it lines up correctly.
A2b-005 keeps this plan consistent by searching out A2a-009 if needed, especially when you’re planning to retreat into it next turn while your benched A2b-005 safely evolves. This smooth transition sets you up for a strong mid-game board.
But there are risks that make this build a bit shakier than others. Starting with A2a-071 without A1a-068 can be punishing—you’ll lose 2 points by default if it gets knocked out before doing anything. On the flip side, starting with A2a-009 without A2a-071 also slows you down. While it has 80 HP, dealing 20 damage most of the time just doesn’t cut it, so you're left hoping to draw into the rest of your setup quickly. Because of these draw-dependence issues, this version can be very hit-or-miss depending on your opening.
Card Choices
The core Trainer lineup is almost identical to the A2b-003 build, so check that section if you want the full reasoning behind staples like A2-148 and A2-147—they still apply here.
The key difference in this version is the addition of A1a-068, which gives you a way to retreat A2a-071 early if you’re forced to start with it. It also helps you power up A2a-071 later without wasting Energy just to retreat, so it ends up being a pretty efficient include.
We’re also running A2b-069 in this list. It helps you hard search for A2a-071 when you open with A2a-009, making your early-game setup a lot more stable. That’s why we’re skipping A2-146 in this version—you’re less focused on evolving lines and more on quickly accessing your alternate attacker.
Because of the space taken up by A1a-068 and A2b-069, we’ve had to cut A1-219 from this version.
Exeggutor Meowscarada
A1-023 is a strong card on its own, making it a natural fit in A2b-007 decks. This variant plays a little differently, giving you the flexibility to lean on either A1-023 or A2b-007, depending on your opening and the matchup.
Ideally, you want to start with two A2b-007 for the 1-point efficiency, but in practice, that rarely happens. A1-023 is often too good to pass up early on—especially if you’re going first. Most of the time, A1-023 handles the early game while A2b-007 comes in to close it out.
A1-023’s 80 damage on turn 2 can swing matchups in your favor. It gives you real chances against tough decks like A1a-018—by knocking out an early A2-050—and puts pressure on A2b-035 or A2-110 before they get rolling. It’s a strong tempo play that can shift the pace of the game.
The downside is clear: if A1-023 gets KO’d early, you're already 2 points down, so A2b-007 has to carry the rest of the game. Running A2-147 helps by keeping your attackers alive longer.
Another awkward situation is starting with A2b-007 and drawing into A1-023 later. At that point, A1-023 isn’t the strongest late-game attacker—but its 80 damage still gives it value in today’s meta.
Card Choices
This list is similar to the A2a-009 variant, with a few key tweaks.
We swapped out A1a-068 for A1-219. Since A1-023 usually attacks until it drops, healing becomes more useful—especially with A2-150 running around and threatening your board. A1-219 gives you some survivability in those mid-game turns.
We’re also using one copy of A2b-069 instead of A2-146. It gives you a direct way to search for A1-023 without relying on Evolution chains, which makes your setup smoother if you’re aiming to open strong with it.
Magnezone Meowscarada
This version pairs A2b-007 with A2-053 to cover a wider range of matchups—especially against non-EX decks. A2b-007 naturally excels against EX-heavy builds, while A2-053 gives you a strong counter in mirrors, A2-111–A2-053 lists, and other non-EX-focused teams.
Since you’re running two Stage 2s, you’ll need to adapt based on what you start with and hope to evolve quickly. The biggest upside is that this is a full non-EX deck, meaning you get access to three threats without giving up more than 1 point each.
Because the deck lacks an ideal early-game starter, you’ll usually open with A2b-005, using its search to grab another Grass Pokémon and set up a benched A2b-005 to evolve into A2b-007. Meanwhile, A1-098 can start charging A2-053 using its Ability, creating a solid one-two punch—go in with A2b-007, then follow up with A2-053 right after.
That said, this variant isn’t without its flaws. It’s actually designed more with tournament settings in mind, where A2b-035 is a common sight and you have more time to safely evolve your Stage 2s. On ladder, it can feel slower and more fragile. Running two Stage 2 lines takes up a lot of deck space, so you’ll feel the pinch on Trainer consistency if either line is disrupted or your opening isn’t ideal.
There’s also the draw issue—you might end up with the wrong half of your deck at the wrong time. A2-053 isn’t ideal when facing EX-heavy teams, and A2b-007 can struggle against low-cost non-EX builds.
Card Choices
The Trainer lineup here is tighter than usual, focused purely on the essentials due to the space taken up by two Stage 2 lines.
You’ve got the mandatory PROMO-007 and PROMO-005, no surprises there. For Tools, we’re running one of each:
- A2-147 helps A2b-007 or A2-053 survive a hit.
- A2-148 extends your damage reach, which is especially useful when you're behind or up against tanky non-EX decks.
A2-150 is a must-include here. Since both attackers have limited reach, being able to bring back escaped threats is key to closing out games.
The final Trainer slot is a hard decision—usually between A1-225 and A2b-069. In this version, I went with A2b-069 for the added consistency. You’d rather open with a solid hand than risk missing early tempo just for the occasional clutch moment with A1-225.
Final Thoughts
A2b-007 is one of the most flexible and efficient attackers in the current format, and it shows through all the different ways you can build around it. Whether you're going for the clean late-game finishes with A2b-003, the control and tempo of A2a-009–A2a-071, the early aggression of A1-022, or the versatile matchups of A2-053, there's a version that fits your playstyle. Some builds are more suited for ladder, others for tournament play—but all of them show just how much depth A2b-007 brings to the table.
If you’re looking for a non-EX deck that can actually keep up with the meta—or you just hate A2b-035—this is hands down one of the best decks to play!